Working with redSHOP Categories
Categories are at the heart of organizing your product catalog within redSHOP. By grouping and segmenting your products into logically defined categories, you make it easier for your customers to better understand the range of your offerings. You have total control over the design and feel of the category pages that your customers see, and the ability to set different individual templates for each category and even offer different layouts for your product displays to make it easier to show your products in the best light. Categories can also be useful when you want to restrict certain products for certain people or companies, which can be done with shopper groups, as well as assigning mass discounts, product wrapping options and shipping rates for specific grouped products.
In this article |
Pre-condition |
|
|
|
Firstly you have one web-site use Joomla and installed redSHOP component. Access your web-site by administrator page by (username/password) has been provided
Secondly you click on Component on main menu and select on "redSHOP"
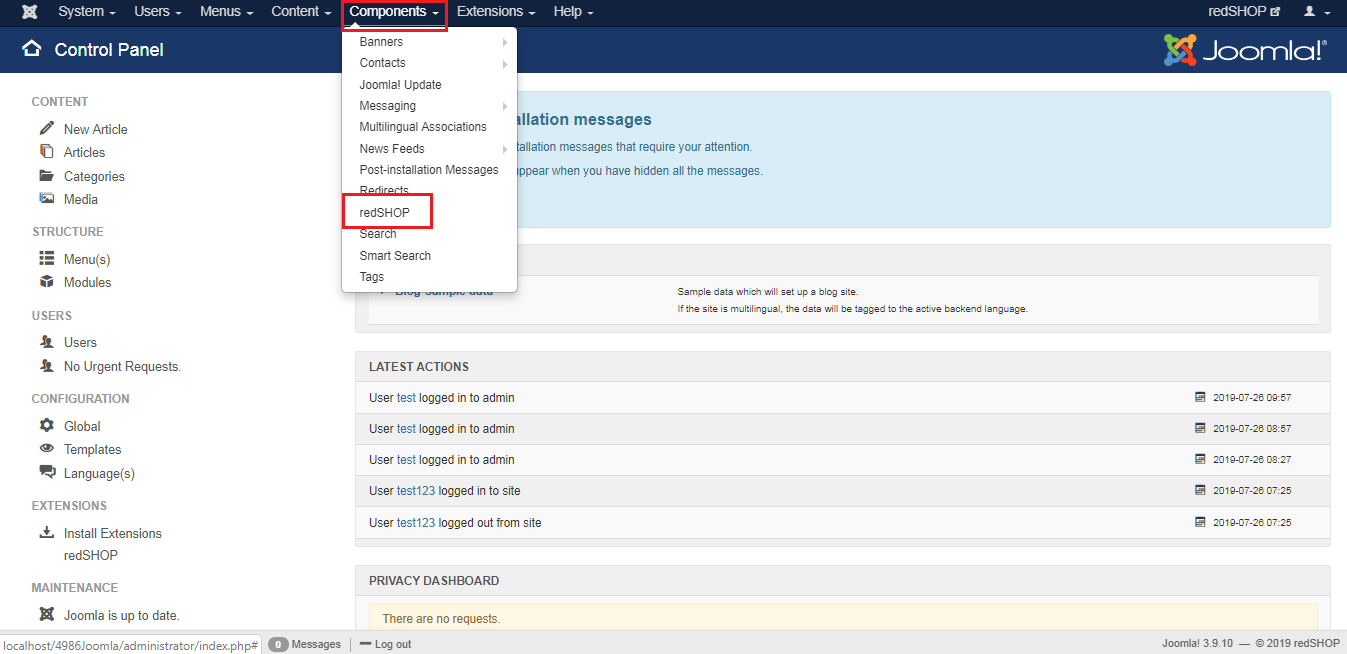
Finally webpage will display overview page administrator of redSHOP and click on Category tab
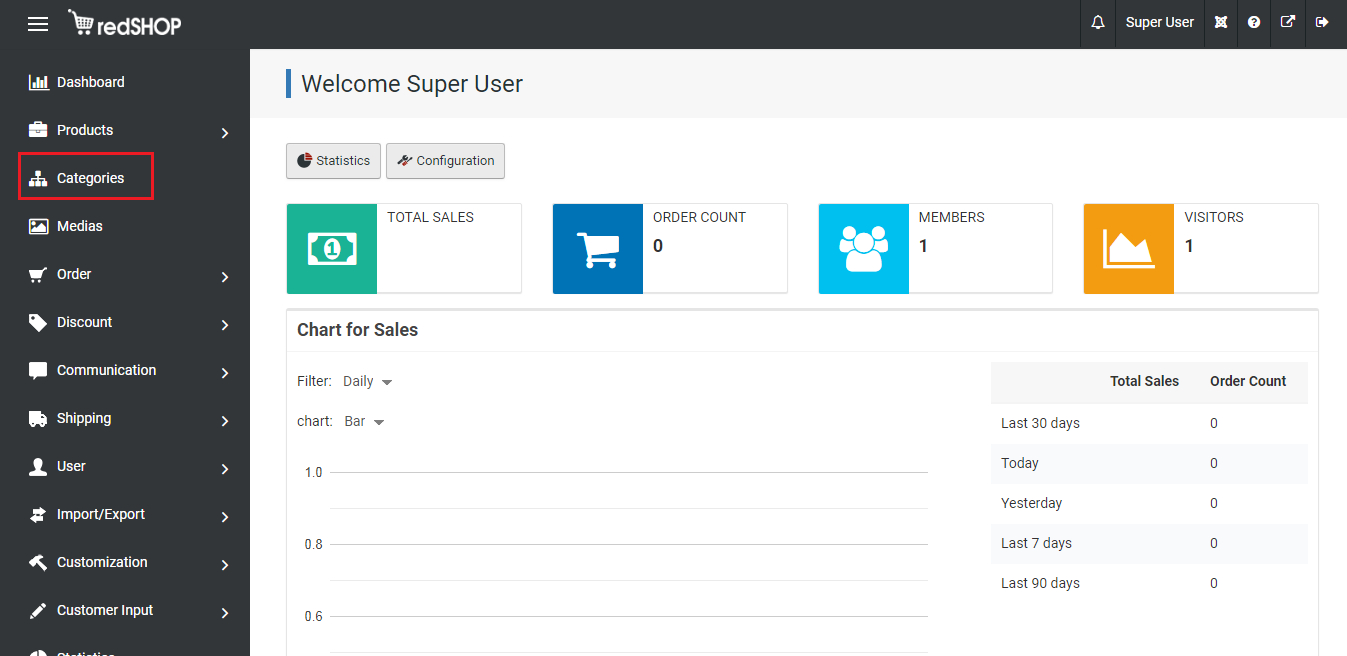
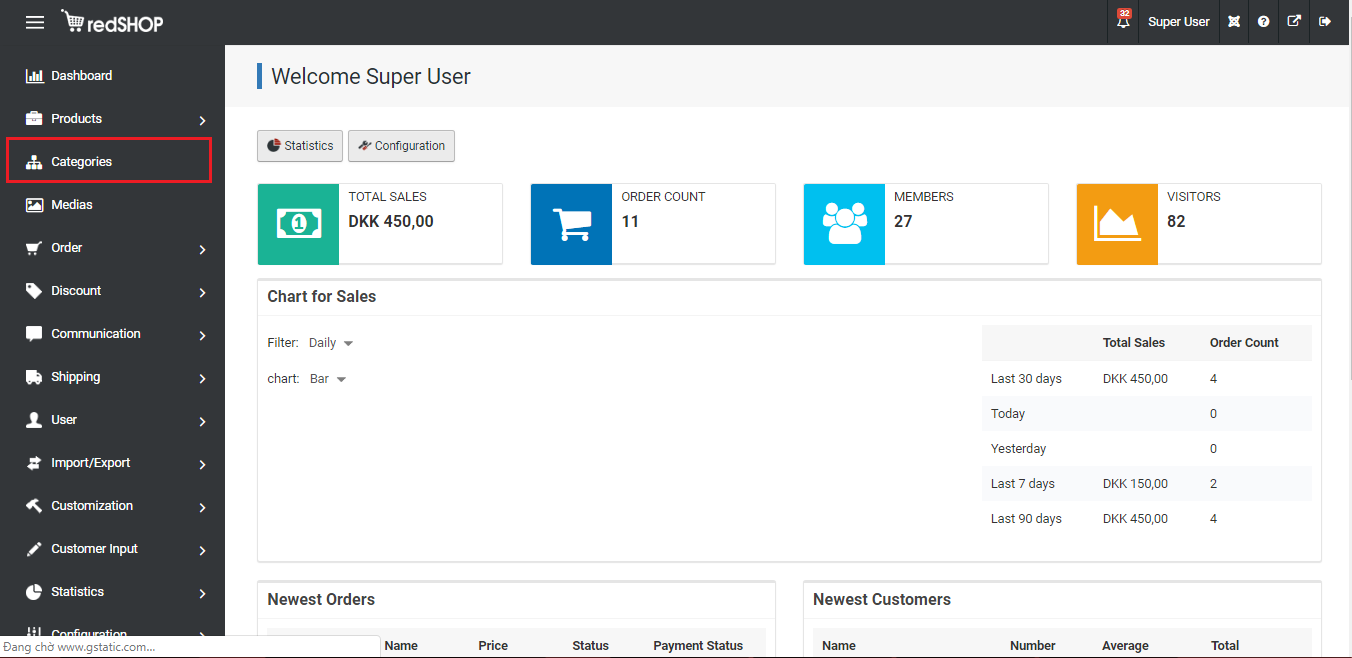
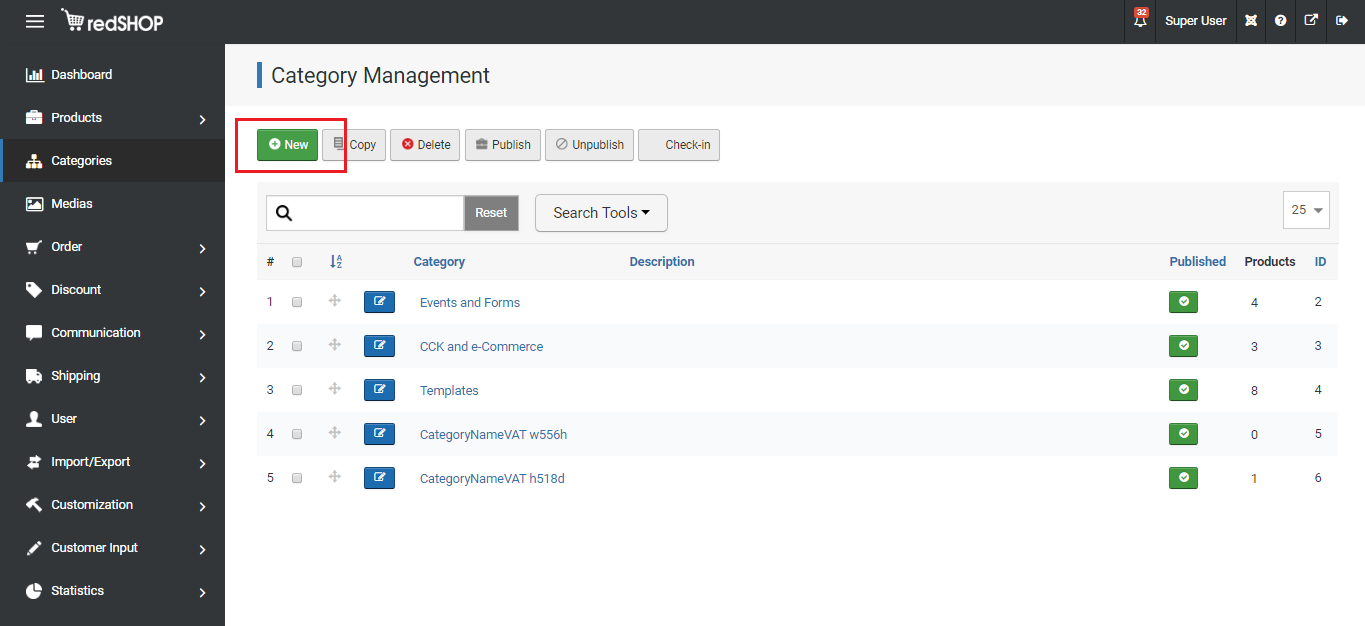
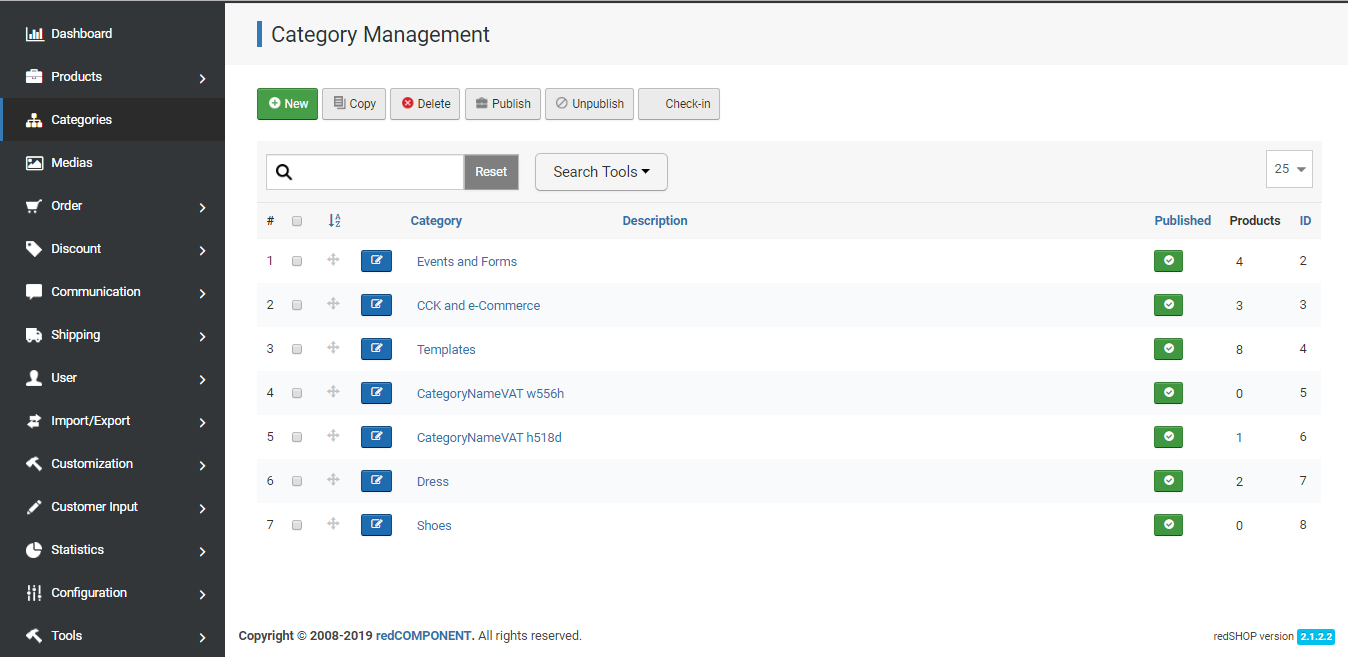
To access the category section, click on the category button on redSHOP's main menu or click on the category list link on the left-hand side navigation panel when you're looking at the listing view anywhere else within redSHOP. You will end up directly on the category management screen, where you will see details listed for all the categories that are currently available.
Overview of Category Listings screen
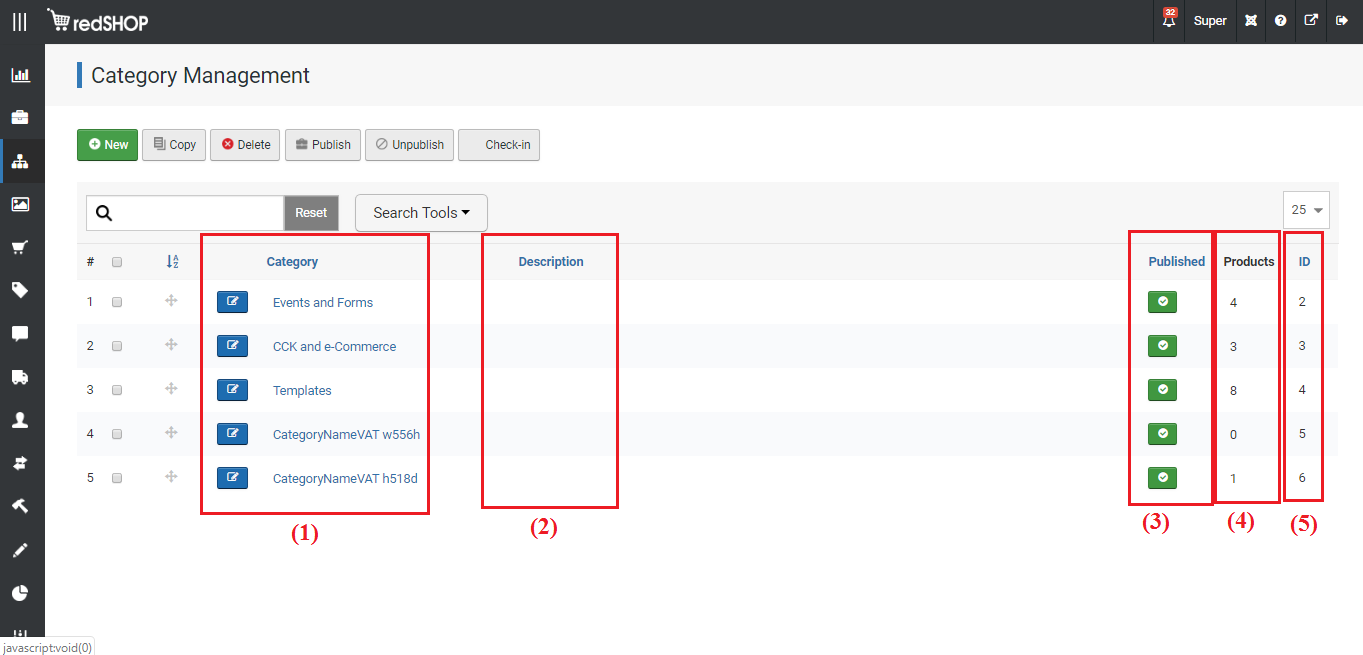
Field
(1) Category - the name of the category, as it will appear on the front-end (note: subcategories will be displayed indented and with "branches", the length of the branches indicating the relationships between each one)
(2) Category Description - the short description given and stored in this category's details
(3) Products - the number of products currently assigned to this category
(4) Order - the order in which you would like your categories to appear on the front-end
(5) Published - sets whether the category will be displayed on the front-end (note: subcategories will also be hidden from view if the main category is unpublished, regardless whether they are published are not themselves)
Action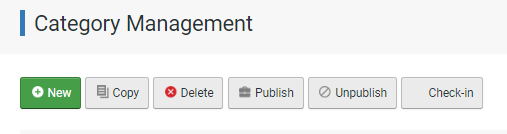
New - appears when adding a new category
Copy - copy 1 or more items has selected. Some information of category items has copy will same with has selected before and name items will increase follow times copy
Delete - delete 1 or more items has selected. Items has deleted will remove list category items
Publish - it change status from unpublish to publish for items category is working
Unpublish - it change status from unpublish to publish for items category not working
Check-in - will unlock any category itemswhen someone viewing it
Overview of Category Details screen
Field
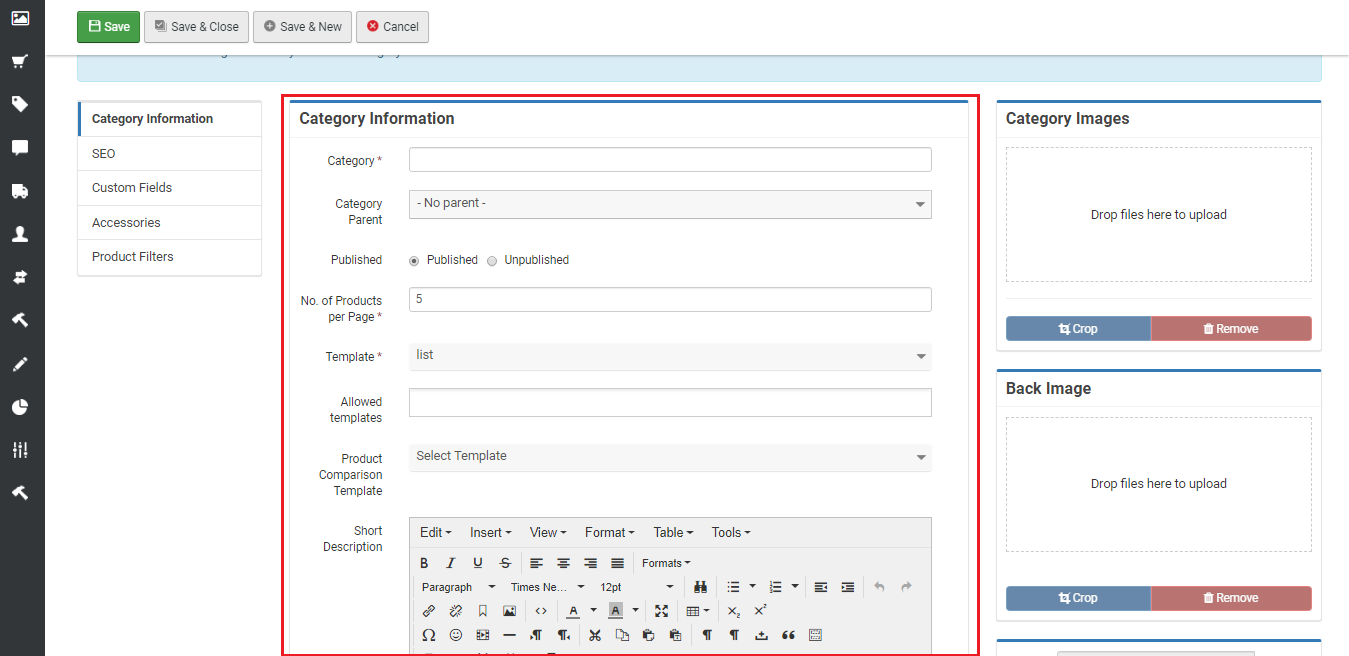
Category - the name of the category, as you would like it to appear on the front-end
Category parent - offers the ability to make this category a subcategory of another one. To make this the main category, leave this option sets to -Top-, otherwise select the category you would want to group this one under.
Published - sets whether the category and be displayed on the front-end (note: subcategories will also be hidden from view if the main category is unpublished, regardless whether they are published are not themselves)
No. of products per page - if there is a large number of products assigned to this category, the number of pages that customers will go through when looking through this category will be determined by the number of products that are displayed on each page
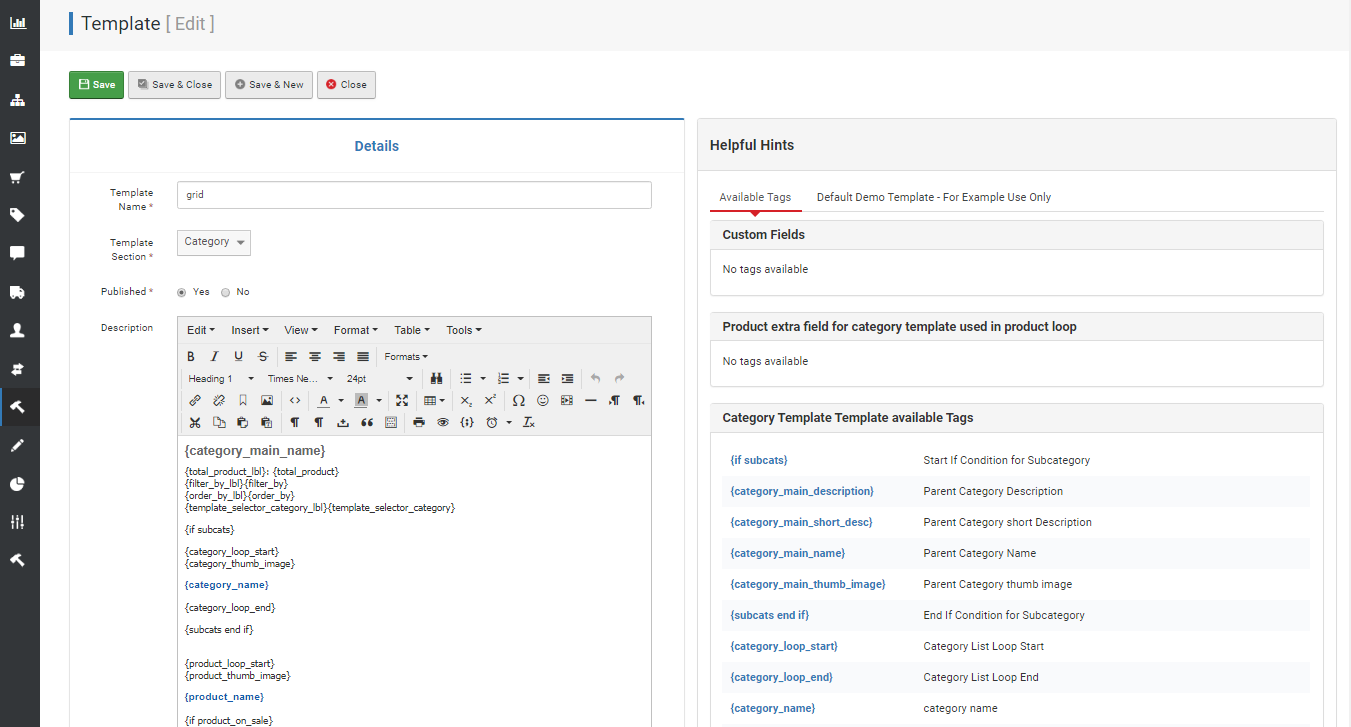
Template - using a drop-down menu listing all available category templates, this setting lets you assign the template that will be used when displaying this category on the front-end
Allowed templates - allows you to assign multiple category templates to be made available to the customer to view this category using different layouts. Hold down the control key while clicking on the category templates available to make your selection, and save your changes. Then go over to the redSHOP template section and make sure that somewhere in your category template, in an appropriate location, appears the {template_selector_category} tag, which when displayed on the front-end will output a drop-down menu with the layouts your customers can choose from
Product Comparison Template - sets the template that will be used when customers select products to compare against each other from within the same category; this feature can be useful as you can design different comparison tables for products in different categories. The "enable product comparison" setting needs to be set to yes for you to take advantage of this feature.
Short Description - a space to store a brief description of the category and/or the products in it; you can insert text, links, HTML and calls for plug-ins or modules Description - a space to store a more elaborate description of the category and/or the products in it; you can insert text, links, HTML and calls for plug-ins or modules
Category Images tab:
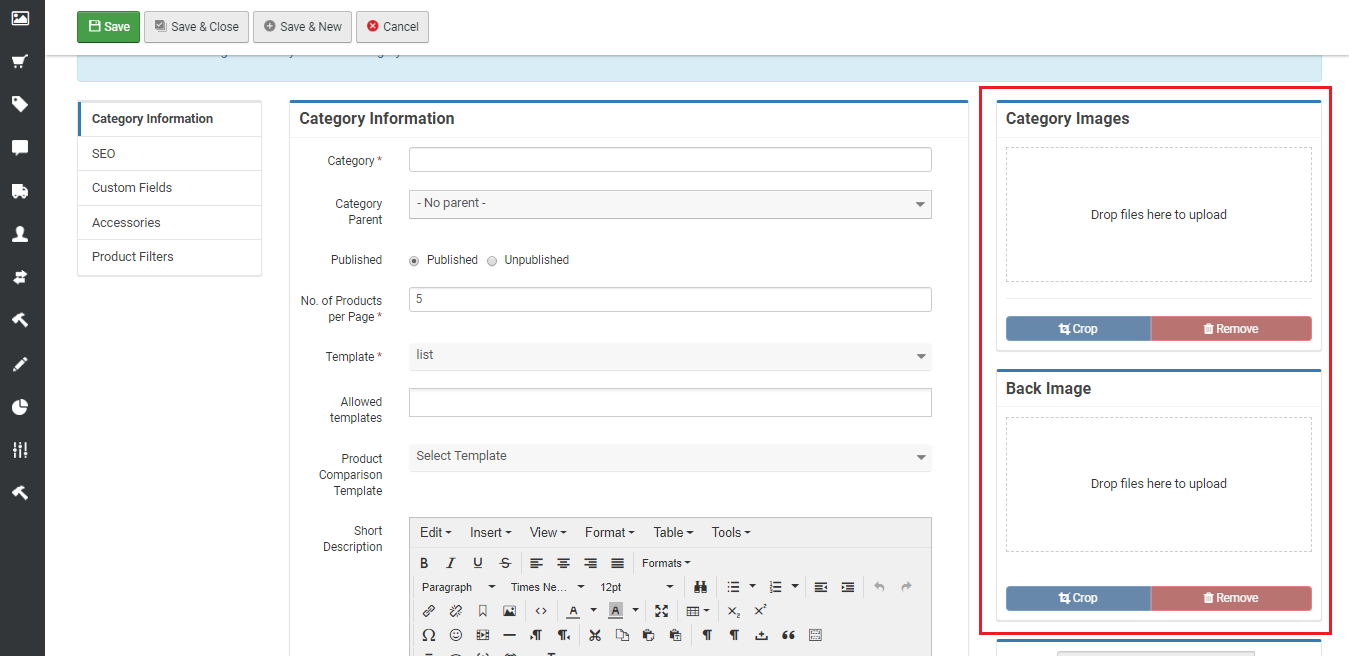
Field
Category Image - the image assigned to represent the category when displayed on the front-end; you can either upload an image from your PC using the browse button or select one from redSHOP's media library using the image button. Category image dimensions can be adjusted in redSHOP's global configuration section, and can be displayed within category templates using the relevant template tags, such as {category_main_thumb_image} or {category_thumb_image}.
Back Image -an alternative image assigned to represent the category when displayed on the front-end, used when appropriate.
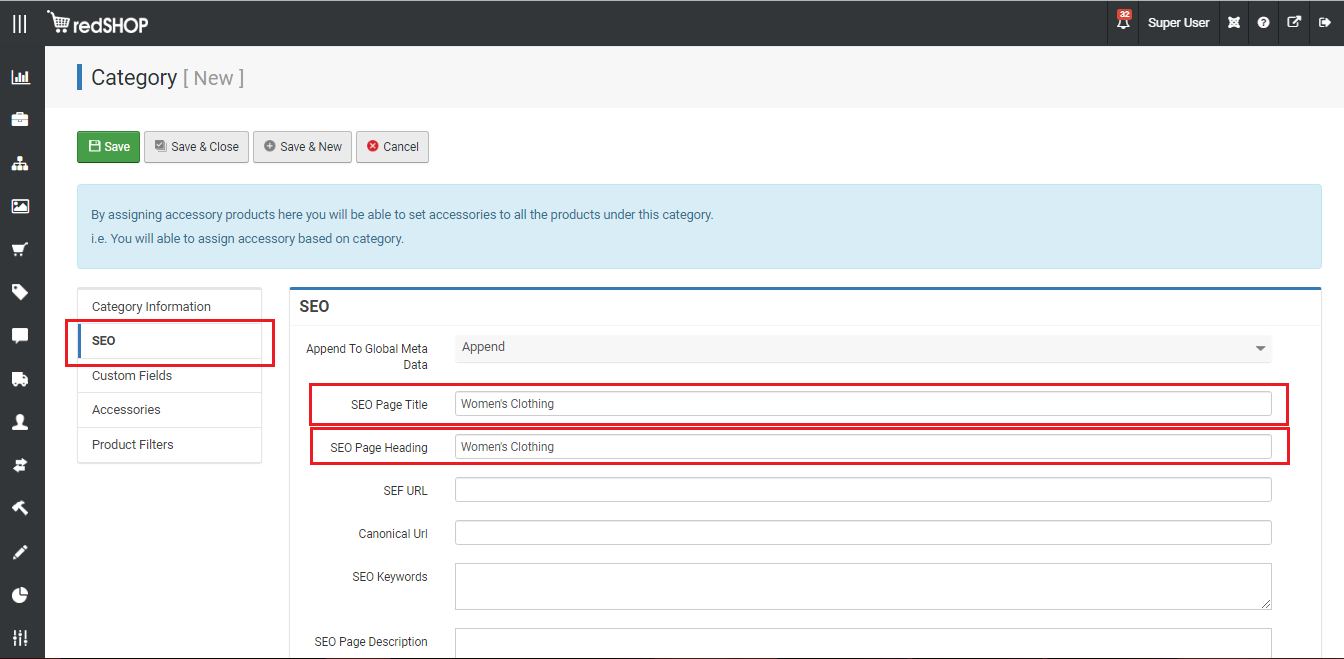
SEO tab:
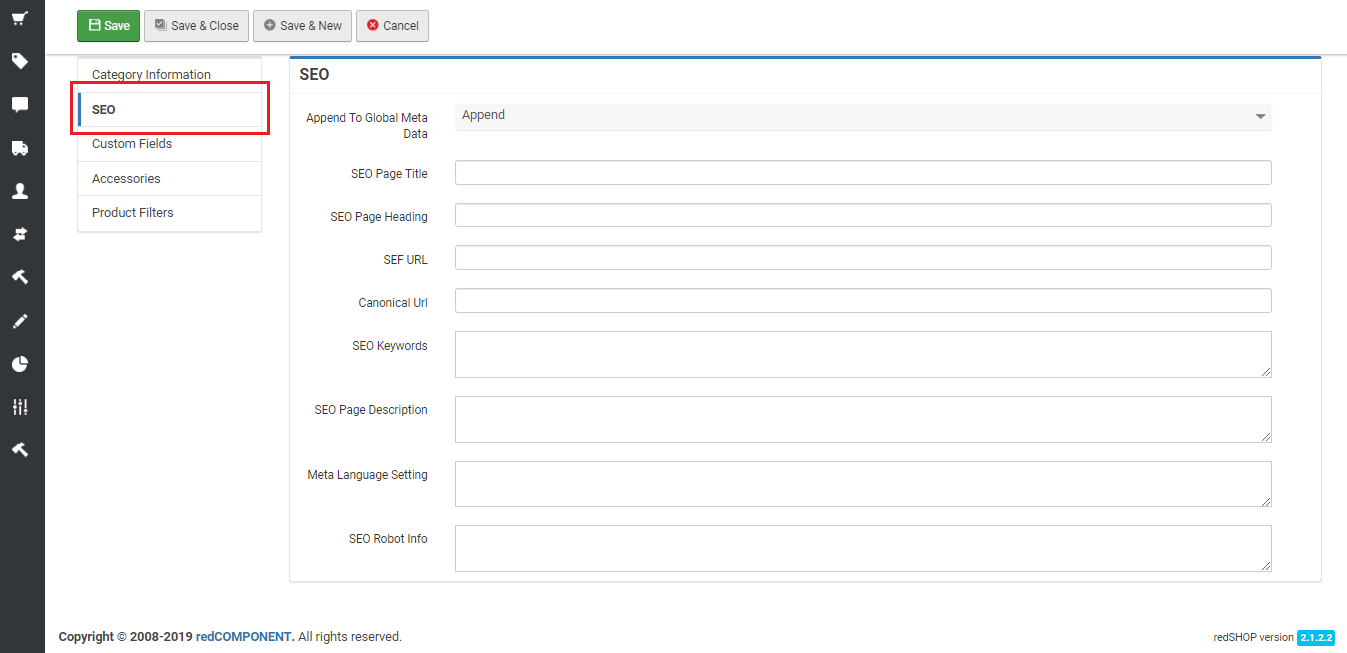
Field
SEO Page Title - the title of the category page, as it will be displayed in search engine results and in the browser's title bar or tab
SEO Page Heading - the main heading for this categories page,
SEF Url - the search engine friendly URL that will be used instead of the standard Joomla! URL that is generated for this category page
SEO Keywords -a space to insert the meta-keywords that are related to this category page
SEO Page Description - a space to insert the method description that is related to this category page
Meta Language Setting - a space to include the languages for which these SCO settings will apply for this category page, indicated by the Joomla! type language and country codes separated by commas, for example "en-GB, fr-FR"
SEO Robot Info - a space to include specific instructions for search engine web crawlers and bots , if the instructions for this page differ from the general instructions that can be put in redSHOP's global configuration SCO tab
Custom Fields tab:
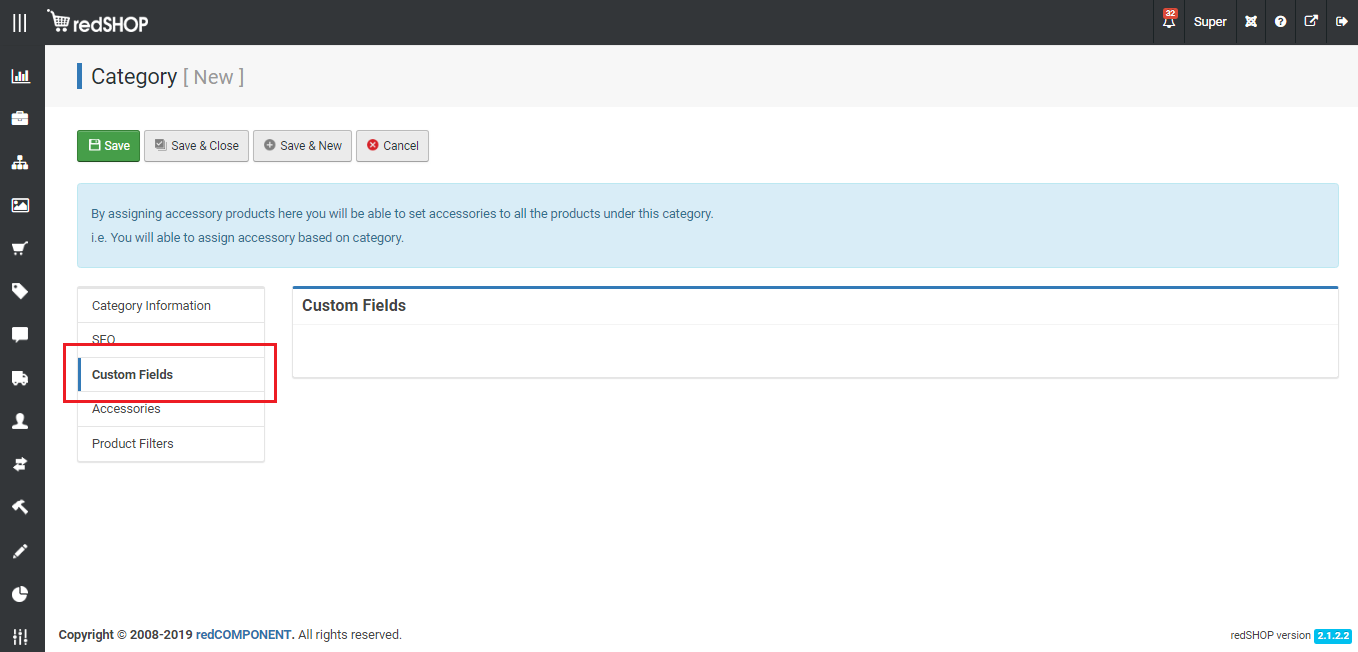
This is the spacewhere all custom category fields that are relevant to this category will appear. More information on what custom fields are and how they work and are used is available in the custom fields section, but in general to assign custom fields to a category you need to set the relevant custom fields to belong in the category section and that the tags for those fields appear somewhere in the category template that is currently assigned to that category.
Accessories tab:
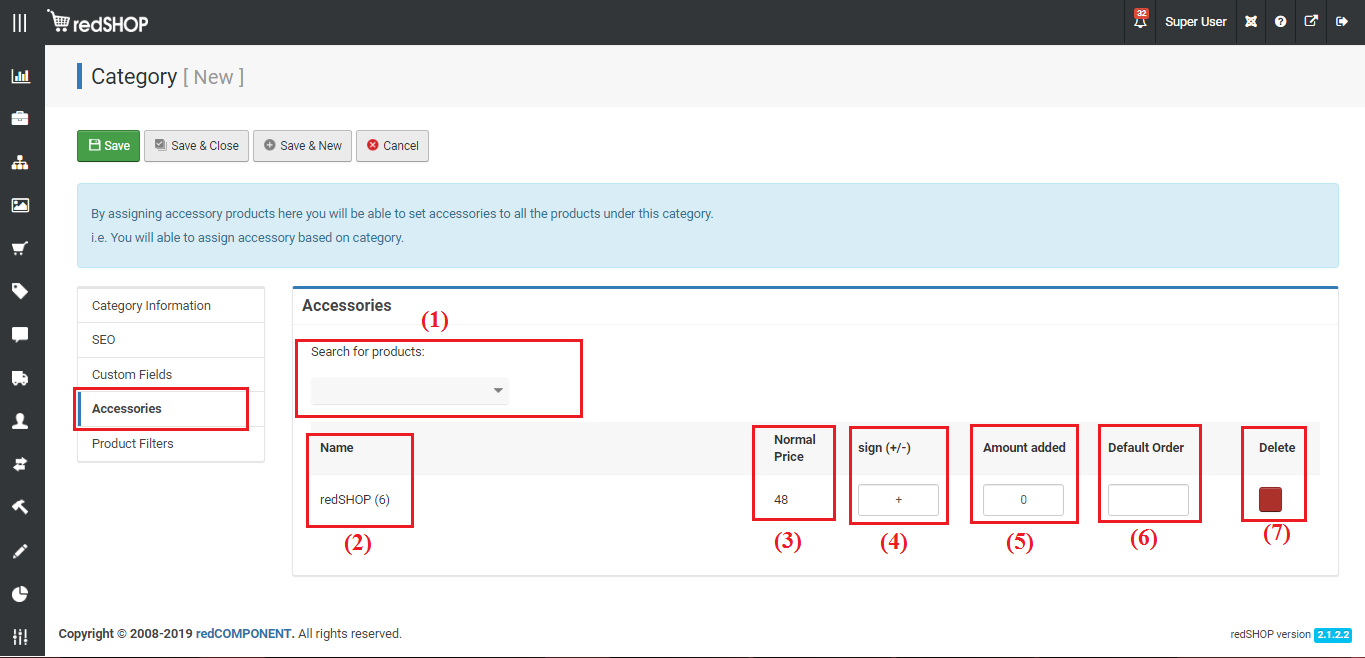
With this feature, you can assign accessory products for all products within this category as well as their price conditions. The accessories that you assign to this category will appear as accessories on the product pages of the products within, even if they have not been assigned to the product specifically. If an accessory has been assigned to a product twice, that is in the category accessories tab and the product accessories tab, the price rules stored in the product accessories tab will be the ones redSHOP uses.
Field
(1) Product Source - an Ajax-powered input box from where you can look up products to add as accessories; type at least three characters that appear in the name of the product you're looking for and wait a moment for a drop-down panel with related search results to appear, then click on the name of the product to select it.
(2) Product Name
(3) Normal Price - the normal price currently assigned to this product
(4) Sign (+/-) - sets whether an amount should be added or removed from the normal price to result in the promotional price
(5) Amount added - the value of the amount that should be added to or removed from the normal price
(6) Default Order - the order in which you would like the accessories displayed on the product page
(7) Delete - removes the accessory product assignment
Action
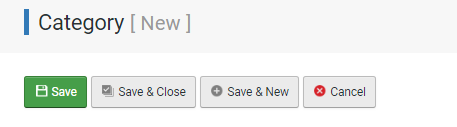
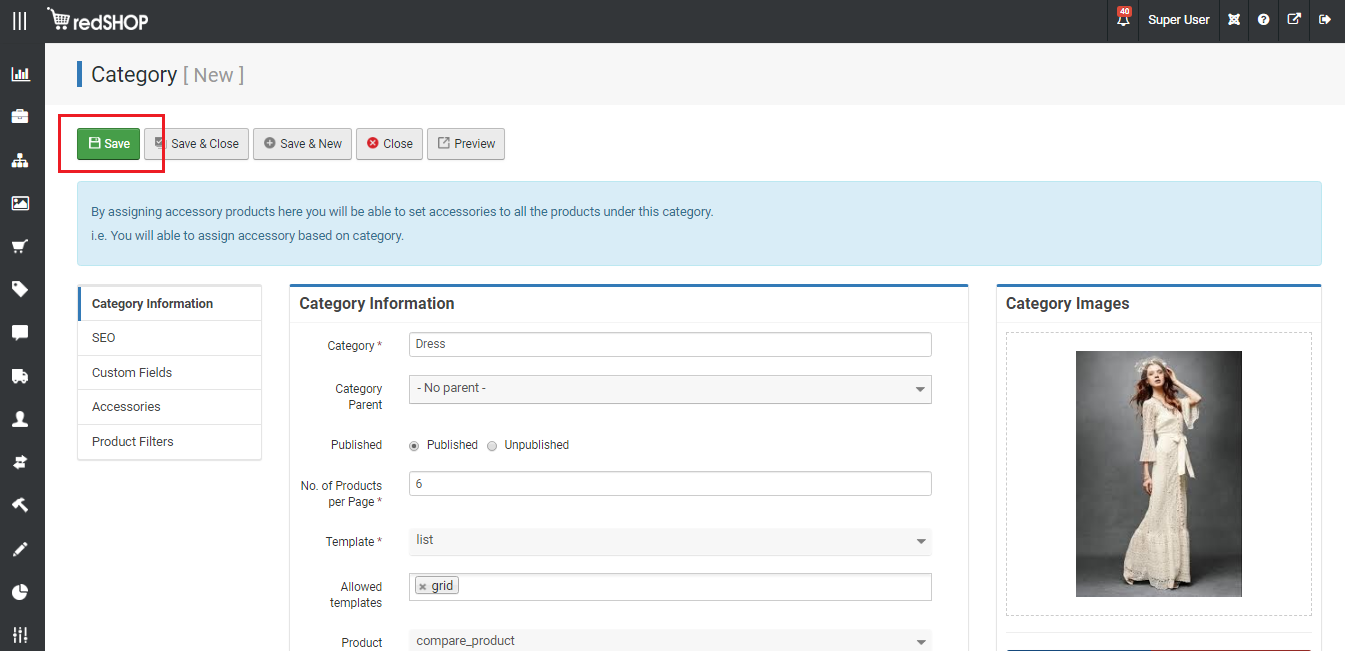
Save - saves changes made and refreshes the page
Save & Close - saves changes made and redirect back to the category listing screen
Save & New - saves changes made and return to the category create page new items other
Cancel - returns to the category listing screen without saving changes
Once you have added a few categories to your product catalog, you can start making use of all the category related features and modules, as well as configuring the look and feel of the templates that will be used to display categories on the front-end.
Working with categories within redSHOP
An elaborate product catalog can benefit from a well structured category system; with the instructions above you can create an unlimited number of categories and nested subcategories.
Create Category items
1. Go to backend page of REDSHOP and select "Categories" tab
2. Category page will display Overview of Category Listings screen. Click on "New" button to create item
3. User fill in some field as: Category, No. of Products per Page, Templates, Category Images
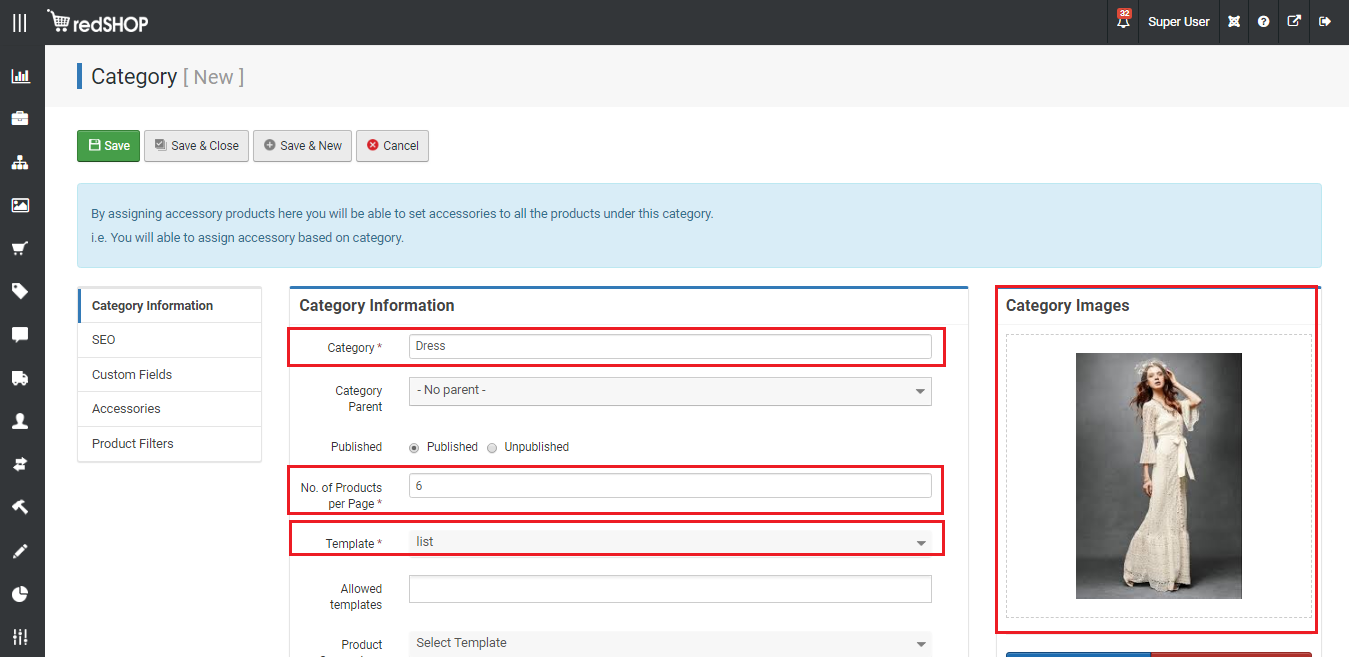
4. Fill in SEO page title, SEO page heading, ...
5. Click on Save button
Video for create Category items: Click here
Assigning products and discounts
To assign a product to a category, head over to the product listing page within the product section and open up the desired product details. Then from within the "Product Information" tab, simply look for the "product category" setting and choose the category in which to assign this product. Selecting the -Top- category will assign the product to the main front-page category, while holding down control on the keyboard and clicking on multiple category names will assign the product to all those categories. Be mindful of assigning products to multiple categories, especially when taking into consideration shopper group access levels, category specific promotions and category dependent shipping rates.
Create product have category just create
Go to backend page of REDSHOP and click Products then select "Product Management" tab. After webpage display Product management, user click on New button

User fill in some field as: name, product number, product category, product price, product image, ... => Click "Save" button
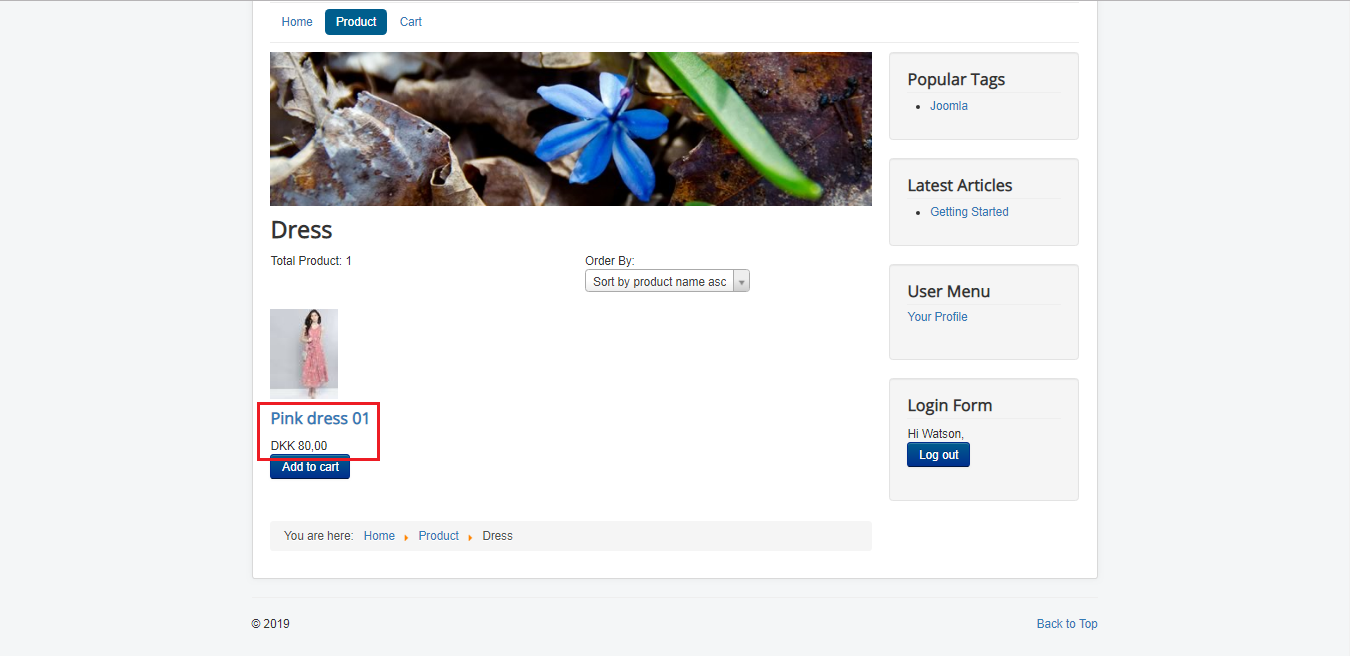
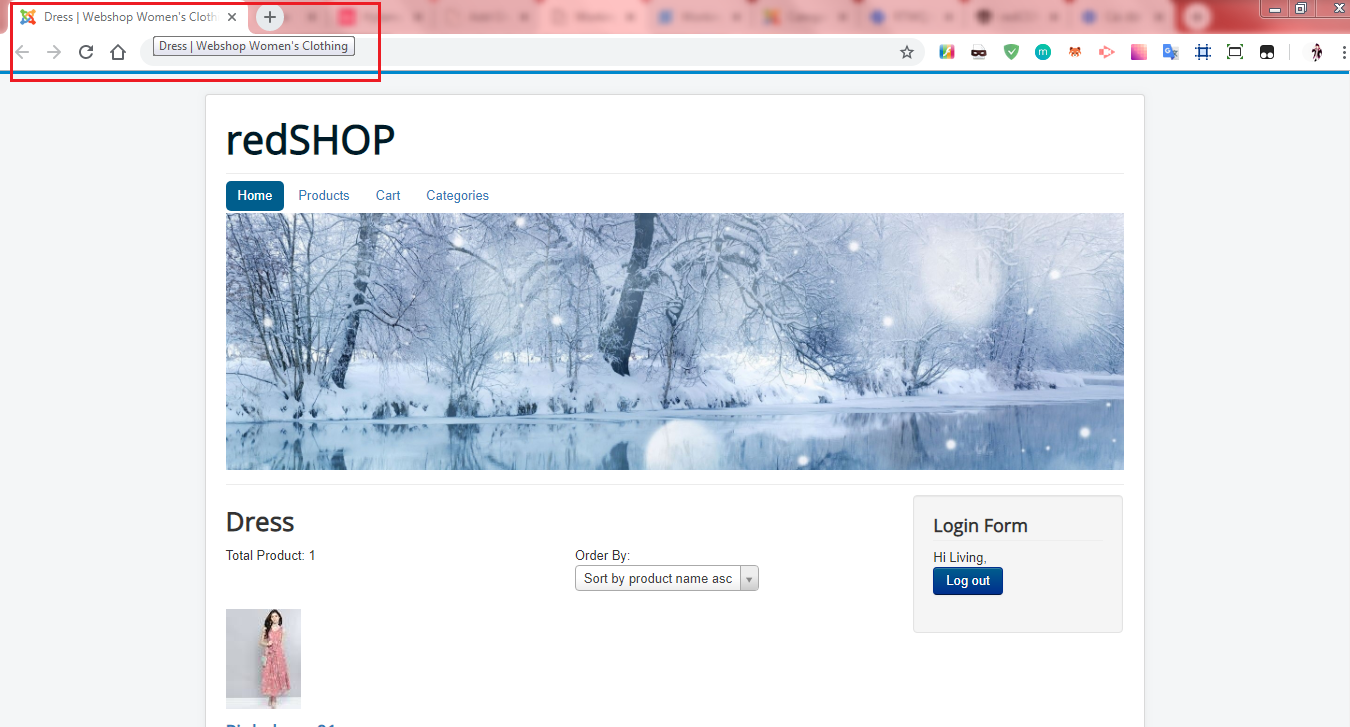
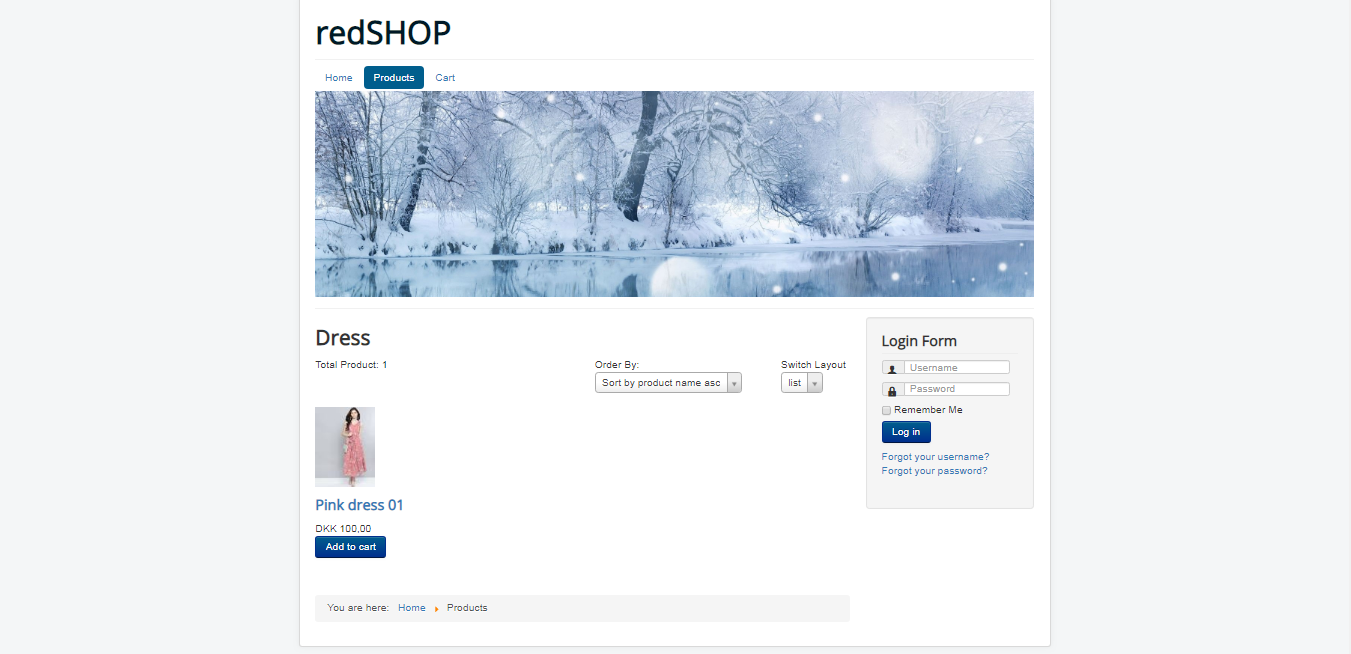
 After save item, click on "Preview" button go to front-end view product detail and see it in category "Dress"
Go to front-end view product detail and see it in category "Dress"

Video for add category in Product Category when user create new product: Click here
Mass discount
When adding a new mass discount, it is possible to limit the discounts affect to specific products, categories, and manufacturers. To apply a mass discount to the products belonging in one or more categories, open up the product panel of the left hand navigation and click on the "add mass discount" link. As you fill out the details of the discount, scroll down to the bottom of the page until you see the category setting complete with a list of the available categories in the catalog. For a single category, simply click on their name and make sure they're highlighted before saving the discount profile, and for multiple categories hold down the control key on your keyboard while clicking on each name to highlight them. The discount will take affect on all the prices of the products in those categories upon saving.
1. Create mass discount from back-end page. Click on "Discount" select on "Mass discounts" and click on "New" button

2. Fill in some field: name, type, amount, Start date, end date, category ... Then click on Save button to save item. After that, click on Close to return Mass Discount Management

3. After return mass discount page click on joomla icon to go to Joomla administrator
 4. Click on Menu and select "Add New Menu Item"

5. User fill in Menu title: Categories, select Menu display on frontend. Then click on Select in field menu items type

6. Webpage will show popup have title Menu Items Type then user select redSHOP items in popup. Choose Category detailed

7. User clicks on Select Category and choose category just created. Click "Save" button to save change

8. Go to front end by way: Click on "View site"

9. Click on Categories on menu

10. Webpage will display all product in category, default price is 100.00, then decrease of price to 80.00. Click on product name to go to Product detail page

11. Product detail will show product price discount

Video for Mass discount of Category: Click hehe
Product Price Discount
Firstly, user can create Shopper group or not. But User have an account to login on frontend.
Next, user create one Product price discount with Category and Shopper Group just created
 After that, user go to front end page and login with user belong in shopper group which selected on the creating Product price discount.
 After go to front end page, user login on page with account on shopper group selected when create price discount item. Product on category which selected on the creating Product price discount, decrease product price from DKK 100 to DKK 80, equal to discount amount on Discount product just create
 Video for Product Price Discount of Category: Click here
Page Access and SEO
In the event that there will be multiple administrators working with the backend of redSHOP, it is possible to restrict access to the category section, as well as define the permissions given to view and modify details, from within the "backend access management" section of redSHOP. This section must be enabled from within redSHOP's global configuration to be available, and this feature requires that shop administrators be assigned to at least one Joomla! backend user group. Simply access the backend access management section from the Main menu button or the left-hand navigation panel and then click on the category link, where you will be presented with options to limit the user groups that have access to the category section as well as their permission to view, create, modify and delete category records and details.
In addition to the SEO settings that can be configured for individual category pages, you can also set up global defaults from the category section within redSHOP's global configuration "SEO" tab. It is possible to create "templates" for redSHOP to follow in automatically constructing page titles, headings, meta-keywords and meta-descriptions, and there are several tags to choose from that represents specific types of information that will be generated when the page loads on the front-end. These global settings will apply for all category pages except those who have their own individual SEO settings defined in which case those will be used instead.
Categories can be used to restrict access to groups of products to customers depending on the shopper group that they belong to. More information on how shopper groups work is available in the user management section, however in general you'll want to access the shopper group management section, either through redSHOP's main menu or via the left-hand navigation panel, and add a new shopper group profile or editing an existing one. Among the profile details, you can select the categories which members of the shopper group will have access to and for which the profile settings will take effect; you can restrict access to a single category or hold down the control key while clicking on multiple categories to restrict access to those. If you're shop is configured to use a portal, in other words customers must login to the shop through a portal page to access the product catalog, you can use the shopper group portal setting within the profile to enforce the login requirement for access to these categories.
 Video for Page Access and SEO of category: Click here
Shipping packaging and rates
Shipping packaging - Wrapping
Similar to the flexibility of the category accessories feature, you can create and assign product packaging and wrapping options to products in one or more categories in batch. To do this, click on the wrapping management button in redSHOP's main menu on the wrapping list link in the left-hand navigation panel to get to the wrapping management section. Click on the new button to add a new product wrapping option and when configuring the details of this option click on the name of the category whose products should have this option available, or hold down the control button on your keyboard and click on multiple names to assign this option to products in multiple categories. More information on how the wrapping management feature works is available in the promotion section.
1. Go to backend page of redSHOP. Then choose Shipping and click on Wrappings tab. Click New button

2. User fill in Name, Wrapping price, Category, .... If you want to apply to all product, click Yes on Use for all products. Click on Save button
 Video for Shipping packaging - Wrapping of Category: Click here
Shipping rate with Category items
You can also use categories to assign shipping rates to groups of products at a time. More information on how shipping rates work is available in the shipping management section, however in general you'll want to access the shipping method list, either through redSHOP main menu or via the left-hand navigation panel, click on the name of the redSHOP default shipping plug-in to open up its details page, and then click on the shipping rates button that appears within to access the shipping rates list that applies to the default shipping method plug-in. As you add a new shipping rate or modify an existing one, scroll down the profile details page until you come across the category setting, and click on the single category name or hold down control while clicking on multiple category names to apply and restrict the details of the shipping rate profile to those particular groups of products.
1. Go to backend page of redSHOP. Then choose Shipping and click on Shipping Method tab. Click on redSHOP - Standard Shipping

2. Webpage will display Shipping: [Edit]. Click on Shipping Rates button

3. Webpage will display Shipping Rate page. Click on New button

4. User fill Shopping Rate Name: Shipper

5. And choose category just created, fill in Shopping Rate, then click on Save button

6. Go to frontend page 

Click on "Product" on menu and add to cart some product
 7. Click on Cart on menu (Create cart menu item) Then click on Checkout button
 8. Login on frontend to get information. Or fill in some field as: E-mail, Last Name, Address, Postal code..... to create shipping address

9. Webpage will choose default shipping (shipping rate just created) Webpage will display Shipping with vat. Click on Chcekout: Final step

10. Webpage will show Shipping method and Shipping with vat on Order receipt.
 Video for Shopping rate of Category: Click here
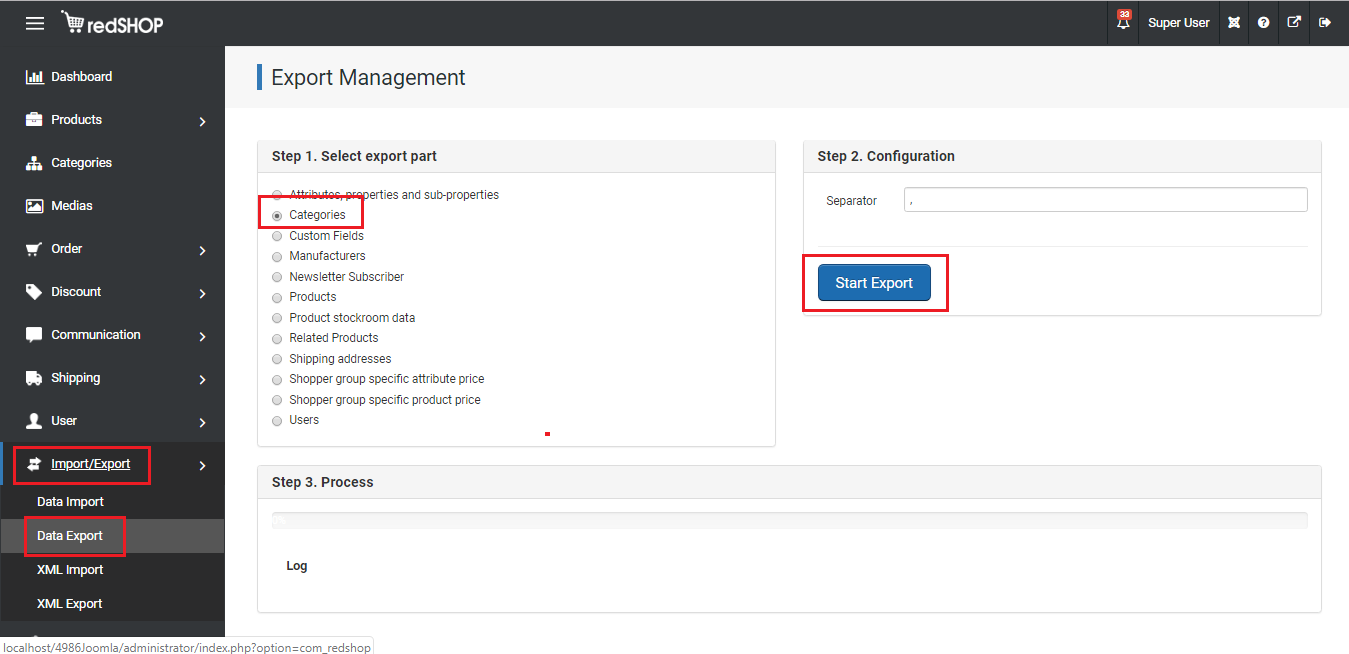
Importing and exporting category data
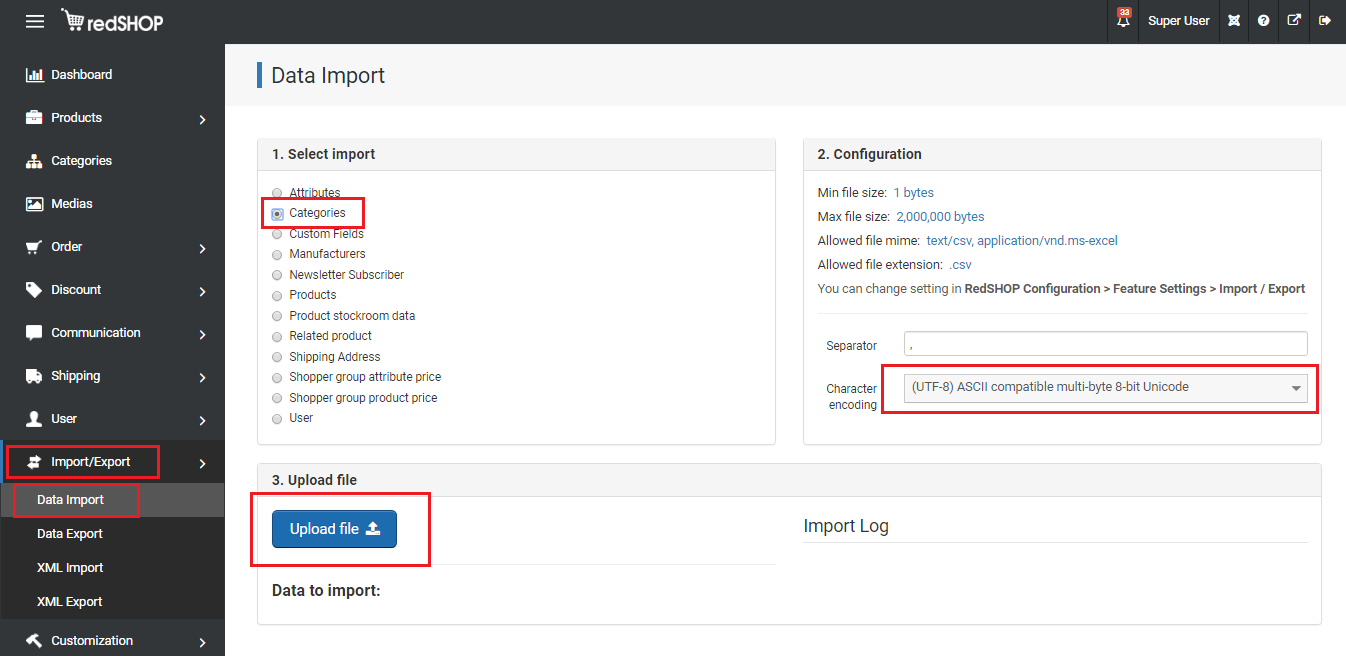
Within redSHOP there is a facility to either import your data from or export your data to CSV or XML formatted files, as well as import details of your product catalog from another shopping cart such as VirtueMart. You can import a category structure for the product catalog from an appropriately formatted CSV file using redSHOP's data import screen, and conversely you can export the category structure set up in redSHOP to a CSV formatted file using the data export screen, both of these accessible from redSHOP's main menu or the left-hand navigation panel. To import your online shop data from an existing virtue mart installation, install redSHOP into the same Joomla! website where virtue mart is installed, then click on the import/export button on redSHOP's main menu and/or choose the "import from VM" link from the left-hand navigation menu and begin the process from the confirmation box that will pop up. When the import has been completed, a report indicating the number of products, categories and manufacturers among other details will be displayed.
Export
Go to redSHOP backend. Click on Import/Export and choose Data Import tab. Then, user select Category radiobutton, click on Upload file and click on Start Export to start download .csv file
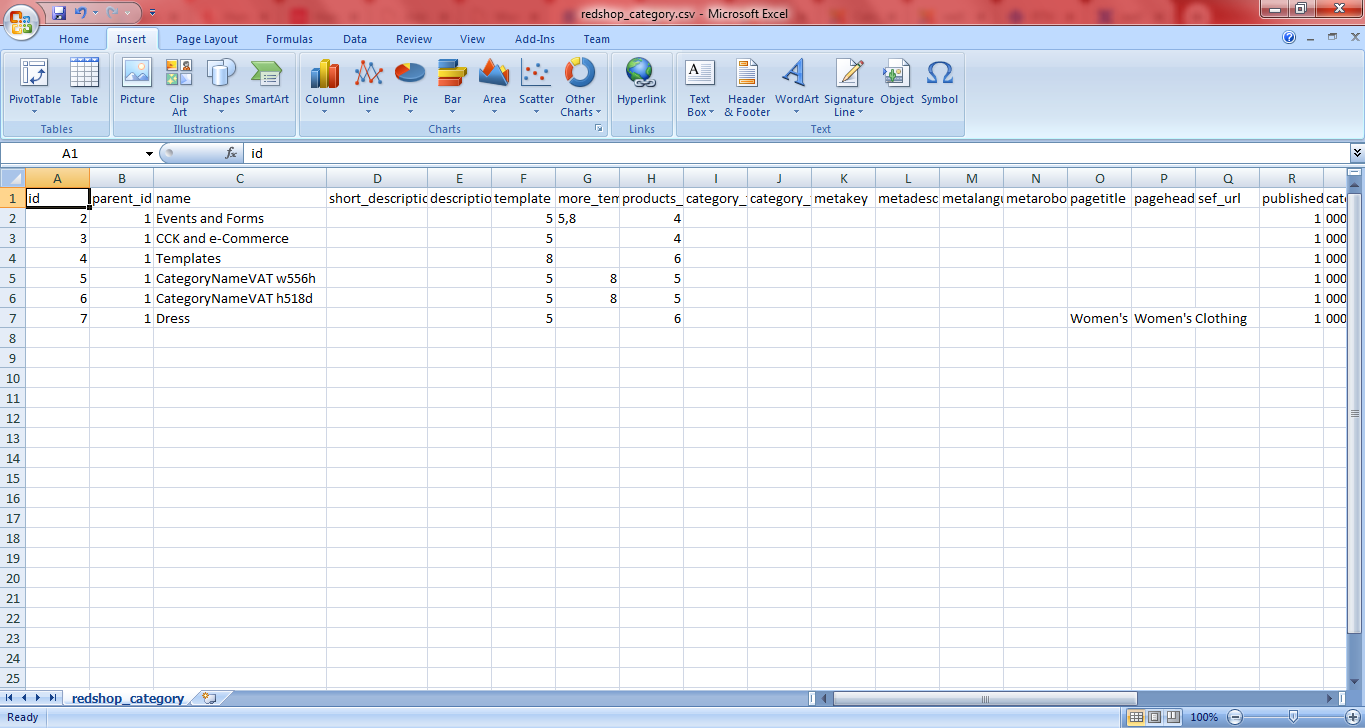
The downloaded .csv file looks like this:
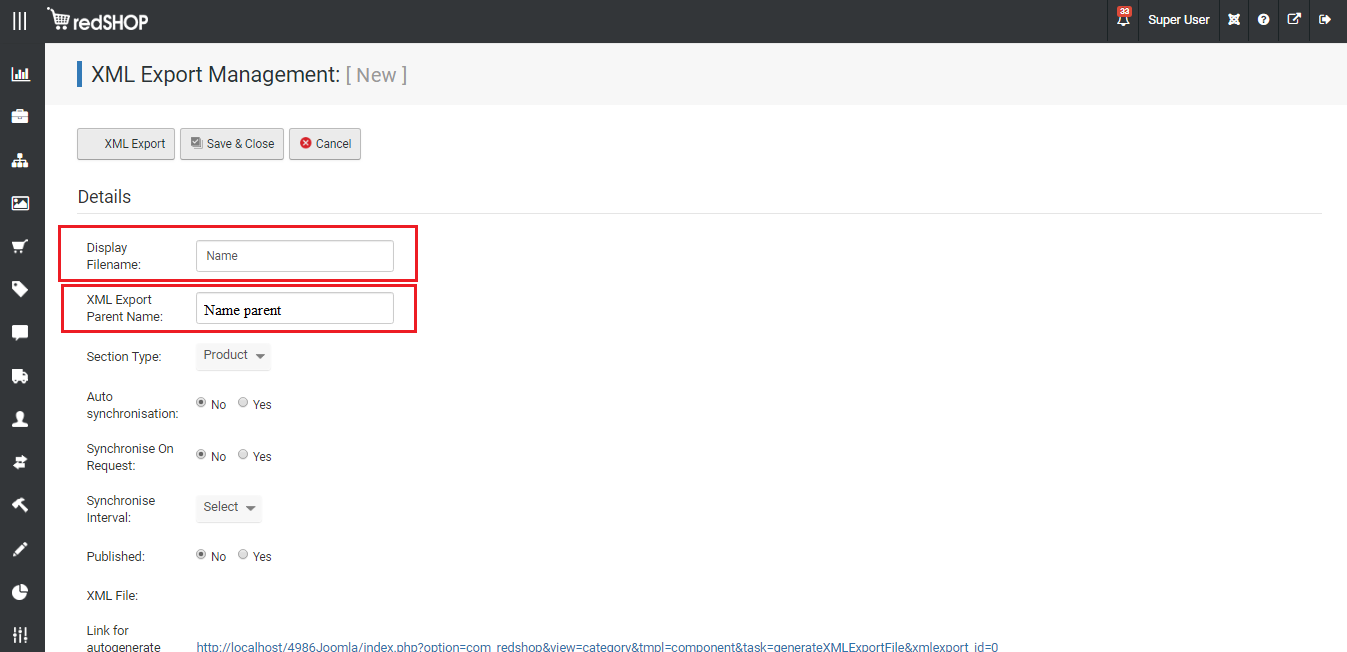
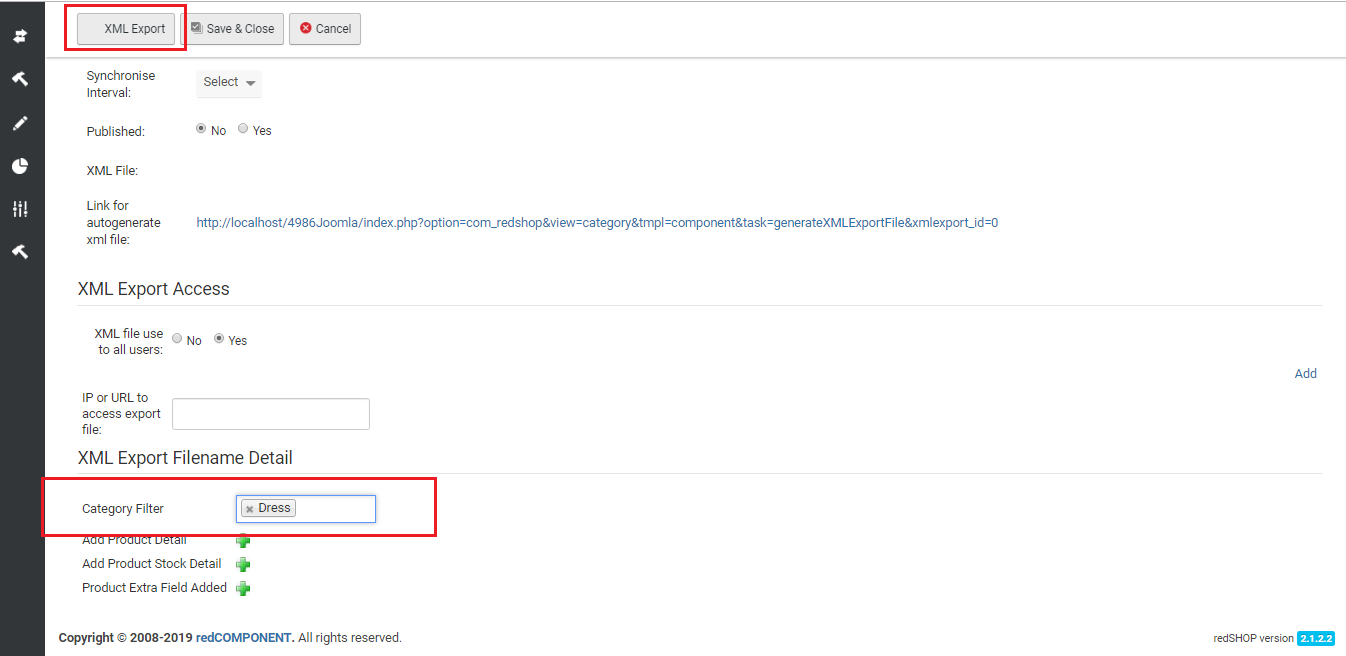
XML Export

Import
Data Import
1. Create .csv file like the form with the export downloaded file
 Go to redSHOP backend. Click on Import/Export and choose Data Import tab. Then, user select Category radiobutton, click on Upload file
Then User clicks on Category, webpage will display the uploaded data
Templates and tags
There are several options within redSHOP's global configuration section that affect the look and layout of category's related pages on the front-end. Within the "product/category" tab, you can set the number of subcategories to be displayed on each category page that has them, as well as the default templates used to display categories and the main category list. Within the "layout" tab, you can modify the default sort order in which categories are displayed, the maximum number of characters that should appear when displaying certain category and product information such as category and product titles, short and main descriptions (and the suffixes to be used to indicate there is more text that is not being displayed), the online store overview description the can appear on the main category list page, and the default images that are to be used when a category or product does not yet have an image assigned to it. Within the "images" tab, you can configure the dimensions of the image thumbnails that appear on category pages for categories and products, as well as up to three variations for each, and you can set if you would like to watermark either of the two.
While it is possible to assign main and back images to a category, it is also possible to upload category images in bulk from within redSHOP's media management section. To access it, click on the media button on redSHOP's main menu or the media list link from within the left-hand navigation panel, and you will end up in the media management screen. To display only the images associated to categories, you can use the "media section" drop-down to filter and display only category related media. Click on the new button and while filling in the related details make sure to select category from the media section drop-down menu to make that media available to all categories. Additionally, you can use the section item field to select a specific category to assign this media to; type in the first letters of the category name and wait a moment while redSHOP generates a drop-down panel with results that you can choose from.

When using the product comparison feature, you can define whether customers will be allowed to compare products from different categories against each other or if those products will need to have come from the same category. This preference can be set in redSHOP's global configuration screen, from the "comparison can be done" setting in the product/category tab. In addition, you can create and assign different comparison templates for each category using the "product comparison template" setting in the categories details to offer customers comparison guides that are relevant to an specific to the products within that particular category. More information on how the product comparison feature works is available in the promotion section.

You can create custom fields for various sections throughout redSHOP, including category pages. To access the custom field section, click on the custom fields button or the custom field list in the left-hand navigation panel, either of which would lead you to the custom field management screen. You can use the "field section" drop-down to filter and display only those custom fields that have been assigned to the manufacturer section. To create a new custom category field, click on the new button or the "add custom field" link and use the "section" drop-down to select category when defining the custom field settings. These custom fields will then have to be added to the category template assigned to a particular category using the tag references before they will become available to use in the "custom Fields" tab in the category details. More information on how custom fields work is available in the custom fields section.

Similar to custom fields, you can also create templates for blocks of text to be used specifically on category pages via the Text Library section. Head over to the text library management section, either through redSHOP's main menu or the left-hand navigation panel, then simply create a new text library item or modify an existing one and assign it to the category section. Like custom fields, you can insert the text tag into your category templates and their equivalent descriptions will be output on the front-end.
When designing the look of the front-end product catalog, there are three pages specific to categories whose templates can be modified:
Category
- the page where all products and subcategories assigned to this category appear


View in frontend with layout product list of category selected. It can modify custom ideas
Category grid
View in frontend with layout products grid of category selected. It can modify custom ideas 
Product category - the page where products are displayed grouped according to the subcategories they belong to

View in frontend with layout category product list. It can modify custom ideas 
Front page category - also known as the main category list page, this template equates to the product catalogs "Main menu" screen that provides an overview of all the main categories

View in frontend with layout category list. It can modify custom ideas
You can set the default category template from within the "product/category" tab in redSHOP's global configuration, as well as assign specific category templates to each category in their respective details pages. You can make specific links for your customers to view any one of these three pages from within Joomla!'s menu manager and using the available redSHOP category menu items, with menu item parameters that define the name of the specific category to refer to, the sorting order of items on that page, and the number of subcategories and products to display per page.
Another way to display and link to your categories within redSHOP is to use one or more of the available category modules that come with the redCOMPONENT subscription and/or that have been made by third party extension developers.
Show Category on Frontend
Category Detailed
1. Go on Joomla administrator then click on "Menus" page Menus will display and on "Menu Items" 
2. User clicks on "New" button to create 1 items menu 
3. User fill in Menu title: "Category details" then choose menu to display on frontend, click on "Select" in field menu items type
 4. Webpage will show popup have title "Menu Items Type" then user select redSHOP items in popup. Click on Ctaegory Detailed

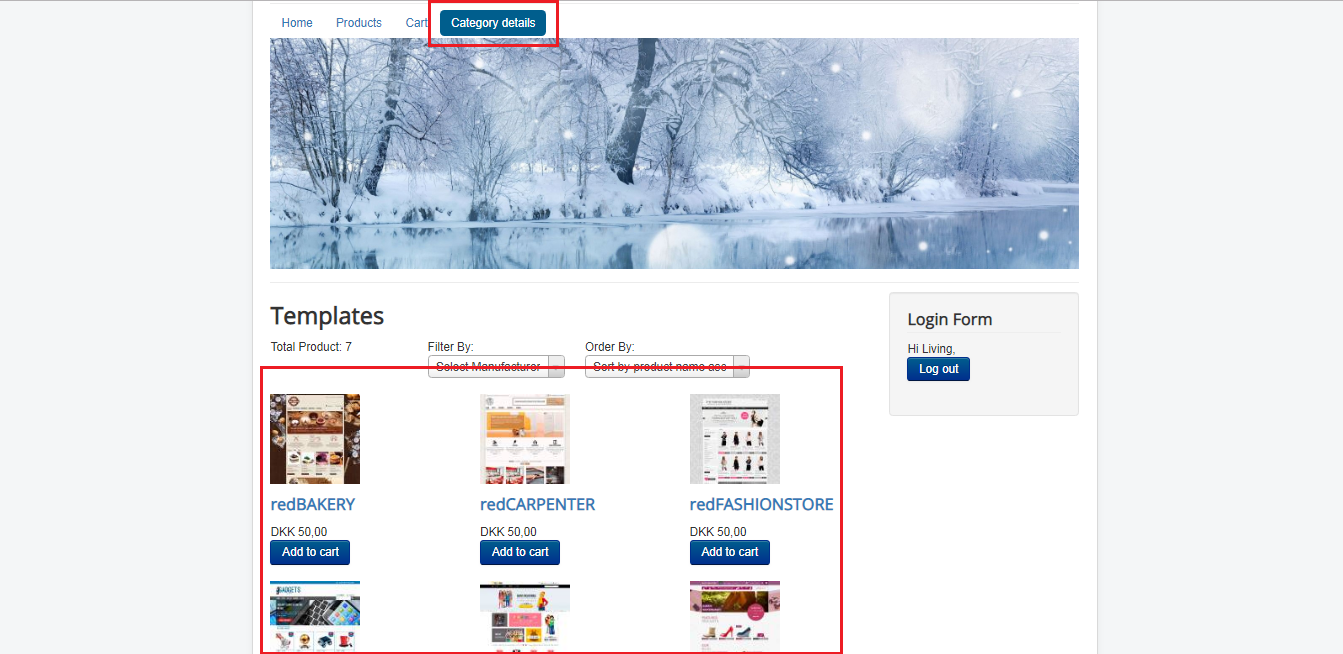
5. After click Category Detailed, Select Category will display on frontend. Then click on Save button  6. User go on frontend and click on "Category details" on menu. Webpage will display product list have on category selected
Video for Show category detail on frontend:
Click here
Frontpage Category
1. Go on Joomla administrator then click on "Menus" page Menus will display and on "Menu Items"
2. User clicks on "New" button to create 1 items menu
3. User fill Frontpage Category on Menu Title, Then select "Frontpage category"

4. Choose menu will display on front end. Click on Save button
5. User go on frontend and click on "Frontpage category" on menu. Webpage will display category list

Video for Show category detail on frontend: Click here


 After save item, click on "Preview" button go to front-end view product detail and see it in category "Dress"


 4. Click on Menu and select "Add New Menu Item"


 After that, user go to front end page and login with user belong in shopper group which selected on the creating Product price discount.
  After go to front end page, user login on page with account on shopper group selected when create price discount item. Product on category which selected on the creating Product price discount, decrease product price from DKK 100 to DKK 80, equal to discount amount on Discount product just create
 Video for Product Price Discount of Category: Click here

 Video for Shipping packaging - Wrapping of Category: Click here


 7. Click on Cart on menu (Create cart menu item) Then click on Checkout button
  8. Login on frontend to get information. Or fill in some field as: E-mail, Last Name, Address, Postal code..... to create shipping address

 Video for Shopping rate of Category: Click here


 Go to redSHOP backend. Click on Import/Export and choose Data Import tab. Then, user select Category radiobutton, click on Upload file


 4. Webpage will show popup have title "Menu Items Type" then user select redSHOP items in popup. Click on Ctaegory Detailed
 6. User go on frontend and click on "Category details" on menu. Webpage will display product list have on category selected
  Video for Show category detail on frontend:
Click here
Video for Show category detail on frontend:
Click here


