Working with Products in redSHOP
One of the main attractions of setting up an online store is letting the world know what you have to offer and making it easy for them to do business with you. With redSHOP you can easily create and manage a catalog of unlimited products ranging from physical tangible goods to digital downloads and subscriptions.
To access the product management section, click on the product but in the main menu or on the product list link in the left navigation panel.
Firstly you have one web-site use Joomla and installed redSHOP component. Access your web-site by administrator page by (username/password) has been provided

Secondly you click on Component on main menu and select on "redSHOP"

Finally webpage will display overview page administrator of redSHOP and click on Product tab then select Product management
Overview of Product Listing screens
Products Listing screen
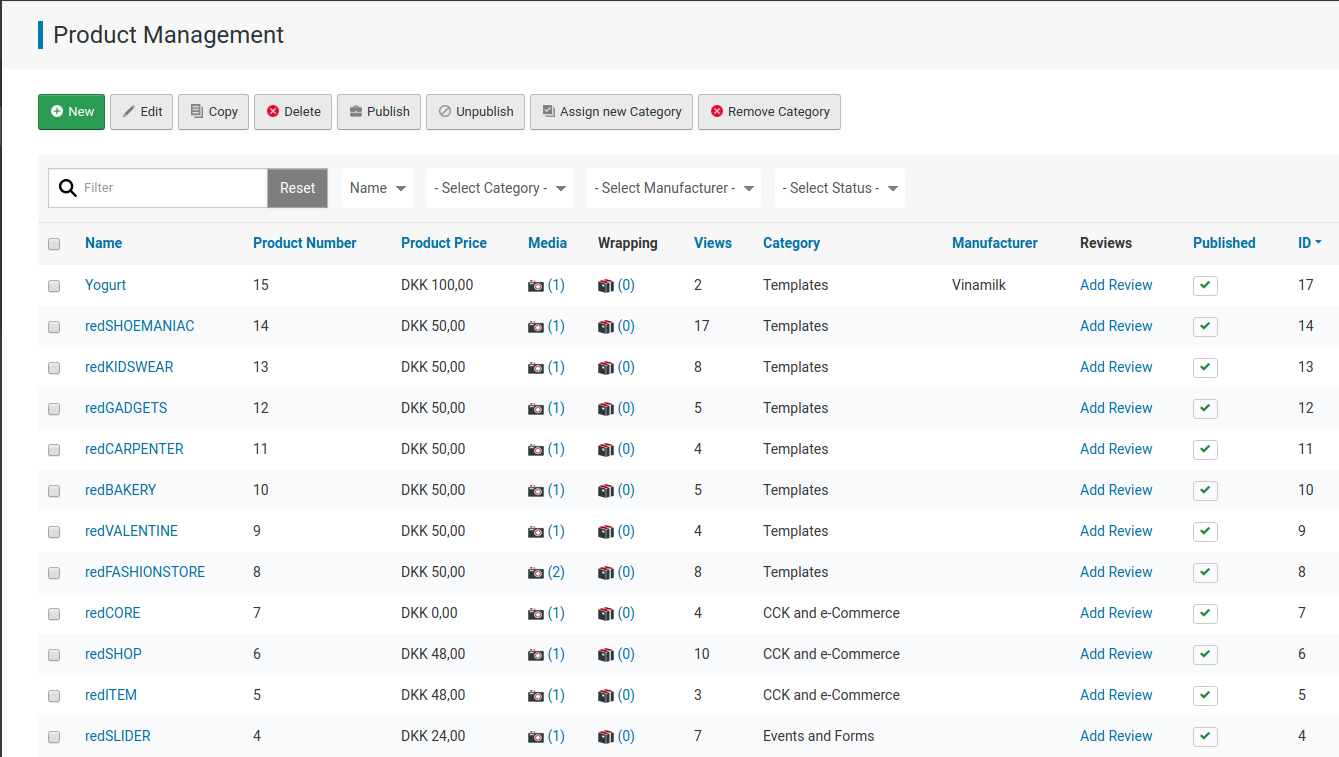
Product Name - the name of the product, as it will appear on the front-end
Product Number - a space to put a unique identifier for this product, such as model number or an SKU
Price - the price currently stored for this product, displayed with the currency symbol of the store currency set in the global configuration screen
Media - the media library icon with the number of images and files currently associated to the product; click on it to open up a lightbox where you can get a more detailed overview and management panel where you can easily add, remove, and publish on publish related files. (More information is available in the media section)
Wrapping Management - the product wrapping listing icon with the number of wrapping options currently assigned to the product; click on it to open up a lightbox where you can add, edit and remove wrapping options on the fly
Number of Views - the number of times that this product has been viewed from the front-end
Category - a list of the categories that the product is currently assigned to
Manufacturer - the name of the manufacturer that the product is currently assigned to
Customer reviews - an add review link that redirects to the new rating screen within redSHOP, where a shop admin can manually enter a new review for display on the product page, with the field of the product referred to preselected and grayed out. More information on reviews and ratings is available in the promotion section.
Published - sets whether the product is displayed on the front-end; clicking on the green tick or the red cross will switch between states immediately
Actions:
New - appears when adding a new product record, click on this to add the new product details to the product catalog
Edit - edit item when want change product items
Copy - copy 1 or more items has selected. Some information of product items has copy will same with has selected before and name items will increase follow times copy
Delete - delete 1 or more items has selected. Items has deleted will remove list items product
Check-in - will unlock any items manufacturer when someone viewing it
Publish - it change status from unpublish to publish for items product is working
Unpublish - it change status from publish to unpublish for items product not working
Assign New Category - lets you easily assign multiple products to one or more categories in batch; click on the check boxes next to the names of the products you want to assign and then click on the assign new category button. The selected products will appear on the following screen where you can select the category (or multiple categories while holding down the control key on the keyboard) and click on the "assign new category" button to update the assignment, or click back if you have changed your mind
Remove Category - similar in function and method to the assigned new category button, this feature lets you remove category assignments in batch.
Product Price View screen
 Webpage will show "Product Price Management"
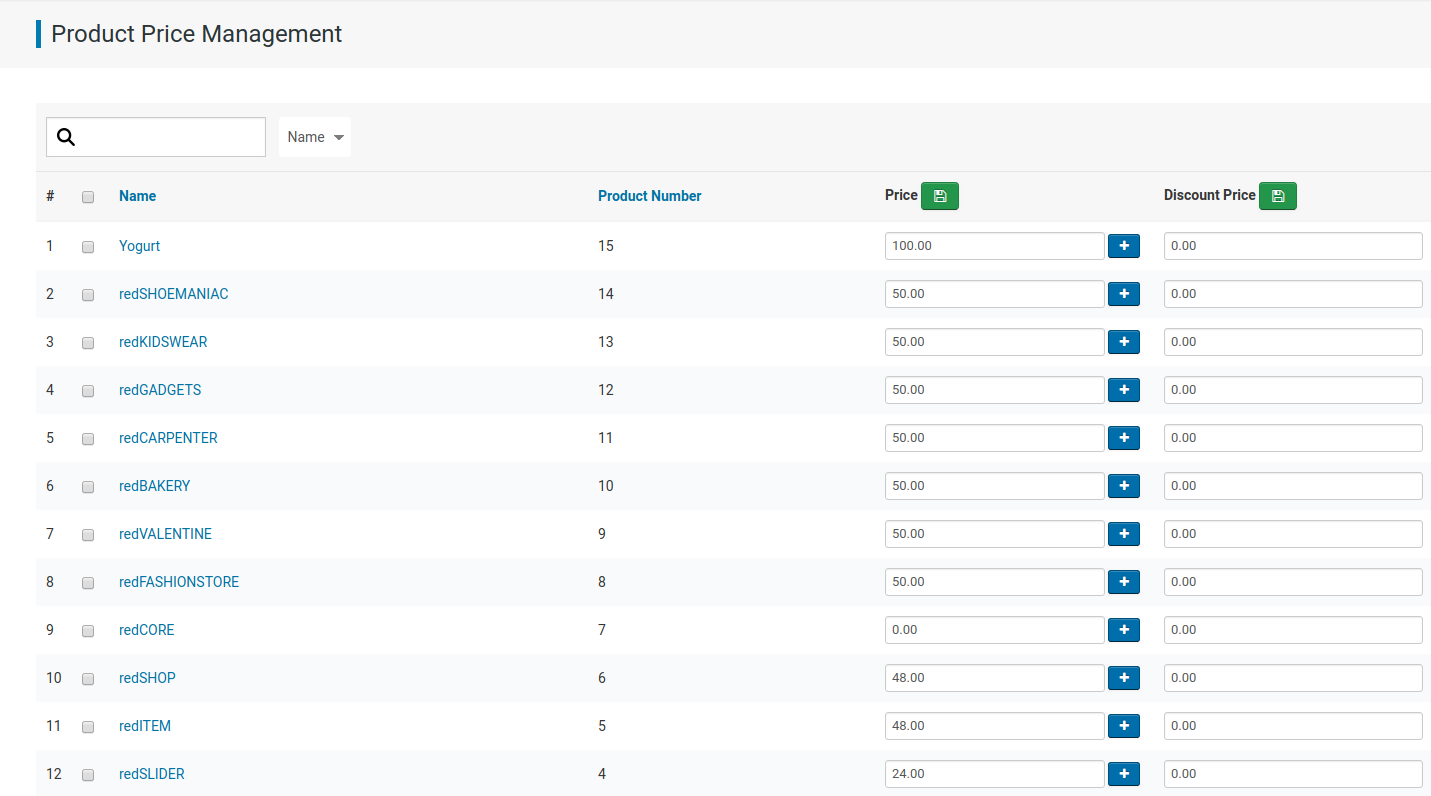
Product Name - the name of the product
Product Number - the model number, string or code that identifies this product
Price - displays the price currently assigned to the product, and lets you update and save the prices of multiple products at the same time. Each product price also has a plus icon link next to it that opens up a lightbox where you can set and update prices for different shopper groups and the quantity range within which a product must be placed an order for it to apply; click on the diskette save icon in the price column to update any changes made (note: prices will be displayed with the number of decimal places set in the global configuration section)
Discount Price - displays the discount price currently assigned to the product and lets you update and save discount prices stored from multiple products at the same time.
Icon Plus - open popup to create discount for Shopper Group have Quantity start, Quantity end, Price
Save button - Save all information when it change
Filters
 Search box - if you want to display specific records, type in at least two characters that appear in the product name, number or associated category of what you're looking for and click on the search button to update and refine the products listed
Search filter controls - sets the type of information that the search box should be basing the list of results to be displayed on; it can look through product names, numbers, a combination of the two and associated categories
Overview of Product Details screen

Product Name - the name of the product, as it will appear on the front-end
Product Number - a space to put a unique identifier for this product, such as model number or an SKU
Product Category - the category of product, in product can have more 1 items category
Product Layout - layout product will show on front-end
Product Type -
redSHOP supports four different types of product you can sell, three that come standard and a fourth "Design" type when redSHOP detects that redDESIGN has been installed:
- Product - configures the product as a physical or tangible good that will need to be shipped to the customer
- Design - configures the product as a design that can be customized and reproduced for a fee (more information is available in the redDESIGN section)
- File - configures the product as a downloadable or digital good that can be set to be bought before the customer has access to it
- Subscription - configures the product as a subscription service with a subscription period and price
Product Types
All products in redSHOP are assigned as the "product" product type by default, and as such do not require any additional information
Design (if installed):
Design - sets the design template to be used
Shopper Group Name - sets the customer user groups that can access and purchase this design
Reddesign Enable - sets whether design customization controls should appear
File
Downloadable Product - sets whether the digital product is for sale and will be accessible to the customer only after proceeding through the checkout process, in which case the
security on this file will be increased (Available options: Yes, No)
Infinite limit for download - sets whether the customer will be able to download this file an unlimited number of times, and if they're not, the setting below sets the maximum number of times that they will be able to download the file. (Available options: Yes, No)
Maximal number of downloads - the maximum number of times that a customer will be able to download the file (dependent obviously on the setting above)
Download Period in Days - the number of days that the customer has to be able to download the file before the link to it expires
Download the last day before - the time (hours: minutes) that the download link will expire on the last day specified by the download period.
Upload CSV file - if you're selling a digital product that will be dependent on serial or license keys, you can use this particular input box to upload an appropriately formatted CSV file that contains all the keys available to this product. A new key will be automatically assigned every time a copy of the digital product will be sold, and you can always add more license keys by simply uploading more data from another CSV file.
Support for more formats of each kind of media can definitely be added, and redSHOP works with other third-party multimedia extensions for Joomla! (such as AVReloaded) that can expand the shop's media capabilities.
To add a file (or multiple files if you want to offer / sell a batch), simply go to the product images tab and click on the "add additional images or media" button, which will open a lightbox window where you can add or remove the files related to this downloadable product. You can also upload files and add their media-specific details within redSHOP's "Media" section.
Subscription
Add - click this to add a new subscription level
Subscription Period - set the number of days, months or years that the subscription will last (Days, Months, Years)
Subscription Price - sets the prices will be charged for the subscription
Delete - removes the subscription level
Subscription Renewal Mail: - sets the number of days before the subscription period ends that the customer should be sent subscription renewal reminder mail
Parent product - a space where you can indicate the main product that this product is a variation of; type in the first few letters of the product name and choose the relevant product from the drop-down panel that will appear
Product Category - displays and sets the categories that this product is currently assigned to; click the category name to group the product into that category, or hold down the control key on the keyboard and click on multiple names to group it into multiple categories
Published - sets whether the product will be displayed on the front-end (Available options: Yes, No)
Product on sale -sets whether the product is currently on a promotional sale; when this is enabled, you can use template tags within the assigned product template that can display a promotional message based on whether the product is on sale or not (Available options: Yes, No)
Special Product - sets whether this product should get special attention, or mark it as the more commonly known "featured product"; products that have been marked as special will appear where ever featured products are displayed, such as in several redSHOP display modules (Available options: Yes, No)
Product Discontinued - sets whether the product has been marked as discontinued or the purchase time has expired; discontinued products can still be displayed on the front-end, but customers will not be able to purchase them or add them to the cart (Available options: Yes, No)
Product not for sale - sets whether the product is no longer for sale; such products can still be displayed on the front-end, but the product price will be hidden and the customer will not be able to purchase them or add them to the cart (Available options: Yes, No)
Product Pre-Order - sets whether the product can be pre-ordered even though it is currently out of stock; by default this is set to "globally", which checks whether the product pre-order feature has been enabled in the global configuration screen and if it is then enabled this feature for this product, but you can set the pre-order facility for this product individually by selecting "yes" or disable the pre-order facility for this product by selecting "no", the individual settings overriding the global ones. (Select: Globally, Yes, No)
Front end link - displays a link that redSHOP generates for you to access and quickly preview the product page on the front-end; this link will be generated only once the product has been saved at least once, and when clicked it will open a new window displaying the product template and its details as they would appear to your customers. (Note: the product must be published for this shortcut link to work, otherwise you will end up on an error page)
Price - the price currently assigned to this product, relative to the main currency that has been selected in the global configuration screen for the online store (note: this price can be displayed in a different currency using redSHOP's currency conversion module)
Discount Price - the promotional discount price currently assigned to this product, relative to the main currency that has been selected in the global configuration screen (note: this price can be displayed in a different currency using redSHOP's currency conversion module)
Discount Start Date - indicates the date when the promotional discount price should start being offered, left blank by default indicating that the discount price is on offer indefinitely; to set the date, click on the calendar icon and select the date using the pop-up calendar, and to remove it simply highlight and delete the stored date
Discount End Date - indicates the date when the promotional discount price should stop being offered, left blank by default indicating that the discount price is on offer indefinitely; to set the date, click on the calendar icon and select the date using the pop-up calendar, and to remove it simply highlight and delete the stored date
VAT/Tax group - sets the VAT/tax group profile which will be used when calculating the taxes for this product based on the tax rate set for the country tax will be collected in; set this to "select" to leave the product without a tax group assignment, otherwise select from the available profiles in the drop-down menu. More information is available in the localization section
Product Volume - a space to enter the total volume for the product, useful when calculating shipping and determining the appropriate shipment container if any shipping boxes have been created
Product Length -a space to enter the length of the product
Width -a space to enter the width of the product
Height -a space to enter the height of the product
Diameter -for products that have a round dimension to them, such as plates or tubes, you can enter the diameter here
Manufacturer - sets the manufacturer that this product has been assigned to, useful for branding and for displaying products groups together by manufacturer; set it to "select" to leave the product unassigned, or select a manufacturer from the drop-down menu
Supplier - sets the supplier that this product has been assigned to, useful for displaying reports on products being supplied by specific suppliers; set it to "select" to leave the product unassigned, or select a manufacturer from the drop-down menu
Weight - a space to enter the total weight of the product, relative to the units of weight and displayed according to the number of decimal places set in the global configuration screen; the product weight can be factored into the cost of shipping
Product Template - sets the product template that will be used when displaying the product page to the customers on the front-end, and based on the template tags that appear in the selected template what details will appear on the page. To add custom fields to a product, simply add their respective custom field template tags into the selected template; redSHOP will detect those fields in the selected template and displayed them in the custom fields tab for you to configure accordingly
Minimum quantity per order - sets the minimum quantity that a customer can order for this product
Maximum quantity per order - sets the maximum quantity that a customer can order for this product
e-conomic Account Group - when you are using the e-conomic accounting integration and have set up a product group profile, you can use this option to assign this product to a specific group
Default product quantities: - while the customer can decide on a specific quantity of product to the cart, you can use this field to present quantity steps to make it easier for your customers to select specific quantities; simply enter the quantity values separated by commas, such as "1,5,10,20,50", make sure the {addtocart_quantity_selectbox} tag has been used in the template for your add to cart button, and your customers can pick these quantities from a drop-down menu
Short Description - a space to store a brief description of the product; you can insert text, links, HTML and calls for plug-ins or modules
Full Description - a space to store a more elaborate description of product; you can insert text, links, HTML and calls for plug-ins or modules
Custom Fields tab
This is the space where all custom category fields that are relevant to this product will appear. More information on what custom fields are and how they work and are used is available in the custom fields section, but in general to assign custom fields to a product you need to set the relevant custom fields to belong in the product section and that the tags for those fields appear somewhere in the product template that is currently assigned to that product.
Images
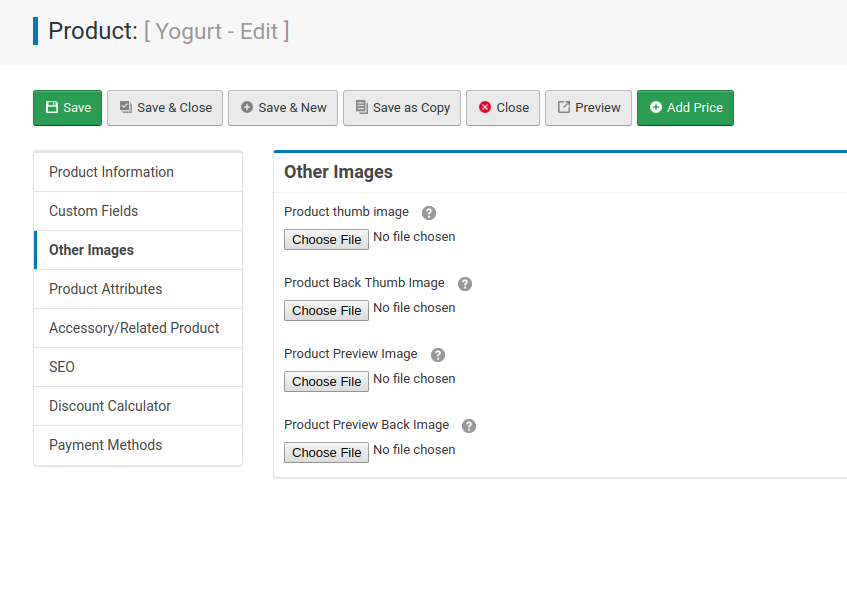
Product Image - sets the main image used to represent this product on the front-end, and displays a preview of the currently selected main product image if one exists; you can select an image to upload from your computer using the browse button, select an image that has already been uploaded to the media library using the image button, or click on the add additional images or media button to add, remove and manage the images and files attached to this product
Delete Current Image - if you wish to remove the currently assigned product image, click on this checkbox and save the changes using the apply or save button and the image will have been removed.
Product thumb - sets the thumbnail image used to represent this product on the front-end, and displays a preview of the currently selected main product image if one exists; redSHOP can automatically generate product thumbnails according to the dimensions specified in the global configuration screen, but if you want to use a different image specifically has your product thumbnail, you can select it to upload from your computer using the browse button
Delete Current Product Thumb - if you wish to remove the currently assigned product thumbnail, click on this checkbox and save the changes using the apply or save button and the image will have been removed
Product Back Image - offers the ability to display an additional image that shows the back of the product
Product Back Thumb Image - offers the ability to display the thumbnail for the back image
Product Preview Image - sets the main image for the product that will appear in the product preview pane
Product Preview Back Image - sets the back image of the product that will appear in the product preview pane
Image management with auto resize for back-end - set image product when user click on it. Go to product detail and click on "Add additional images or medias"
Click on any image have on list image
 Webpage will show popup have contain image product

Image management with auto resize for front-end - set zoom in image product when user click on it. It will show popup contain image have large size it will setup on config in Configuration and at Products tab

 Select "Yes" on Show Product Detail Image in Lightbox. Then go to product detail and click on main image

Product Attributes tab
If you have built up an attribute set in the attribute profile section in redSHOP, you can import the attributes from those sets to apply to this product by choosing the set from the drop-down menu, selecting yes and clicking on either apply or save to update the changes.
On Frontend
Copy Attribute Set from Attribute Bank - sets whether the attribute set selected in the drop-down menu will be copied to this product; regardless of whether the set has been selected, attributes will not get copied as long as this has been set to no (Available options: Yes, No)
Attribute set - select an attribute set which can be copied to this product (Select: from available sets in bank)
"Add Attribute parameter" link - click to add and define a new product attribute
Sub Property - the name or label given to the group of options you can select a product variation of
Order - sets the order in which attributes will be displayed on the front end
Atttribute required - sets whether a variation of this product attributes has to be selected before the product can be added to the cart
Published - sets whether the attribute will be displayed and available to select from on the front-end
Attribute value - click this link to add another variation of the attribute, a row for the new variation will appear below the last ones listed
Delete attribute - removes the attribute and all sub properties
Allow multiple selection of attributes - when this is checked, your customers will be able to pick multiple variations of the same attribute by overriding the selection made for the display type setting and showing the available variations with checkboxes next to them; if variations have price levels attached to them, each variation selected will affect the product price accordingly
Hide Attribute Price - sets whether the price assigned to the attribute variation will be hidden from display; normally variation prices are shown in brackets together with the currency set in the global configuration screen or selected in redSHOP's currency module
Display Type - sets the way the variations will be displayed on the product page for selection; normally you can only pick one variation of an attribute so you can choose between a drop-down list or radio buttons (Select: single select / Dropdown List, radio buttons)
Attribute value - the name or label given to the option the customer can choose from
Order - sets the order in which attribute values will be displayed
Preselected - sets whether this option should be preselected when the customer arrives on the product page
Price - here you can set the price that this option is valued at, and use one of four math symbols to affect the product price accordingly; set a + character to add to the price, a - character to remove from the product price, a * character to multiply the product price by a certain value (can accept percentages such as 1.15) and a / character to divide the product price by a certain value
Image - sets the image that will be displayed on the front-end to visually represent this option, and when the customer picks this option the image on the product page will update and change display this one; you can select an image to upload from your computer using the browse button, assign an image that's been stored in the media library using the button with the picture graphic in it, or click on the X / Remove button to remove the assigned image (the image itself will still be stored in the media library)
Virtual product # - a space to put a unique identifier for this product variation, such as model number or an SKU
More Images - represented by the graphic of a camera, clicking this button will open a lightbox where you can add and manage additional images you may want to be shown for this product
Stock amount - represented by the graphic of an arrow into an inbox, clicking this button will open a lightbox where you can view and manage the current and pre-order stock levels for this product variation
Discount - represented by the graphic of the piggy bank, clicking this button will open a lightbox where you can add and manage price brackets and price levels for members of specific shopper groups, as well as discount prices and the length of promotion
New sub property - click this link to create and define a second group of options which will be displayed if the main option will be selected, starting with the option group name and the first option; click this link again to add more options to the group
Sub property - the name or label given to this group of options
Required Sub Attribute - sets whether a selection has to be made from this group of options before the customer can add the product can't
Multiselect Sub Attribute - when this is checked, your customers will be able to pick multiple variations of the same attribute by overriding the selection made for the display type setting and showing the available variations with checkboxes next to them; if variations have price levels attached to them, each variation selected will affect the product price accordingly
Display type - sets the way the variations will be displayed on the product page for selection; normally you can only pick one variation of an attribute so you can choose between a drop-down list or radio buttons (Select: single select / Dropdown List, radio buttons)
Order - sets the order in which options will be displayed
Preselected - sets whether this option should be preselected when the customer arrives on the product page
Price - here you can set the price that this option is valued at, and use one of four math symbols to affect the product price accordingly; set a + character to add to the price, a - character to remove from the product price, a * character to multiply the product price by a certain value (can accept percentages such as 1.15) and a / character to divide the product price by a certain value
Image - sets the image that will be displayed on the front-end to visually represent this option, and when the customer picks this option the image on the product page will update and change display this one; you can select an image to upload from your computer using the browse button, assign an image that's been stored in the media library using the button with the picture graphic in it, or click on the X / Remove button to remove the assigned image (the image itself will still be stored in the media library)
Accessory/ Related Product tab
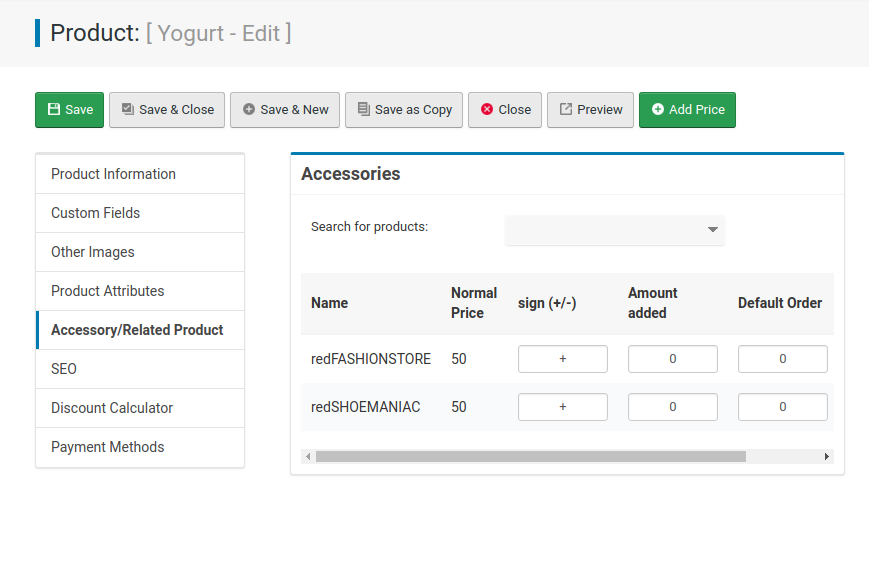
On frontend
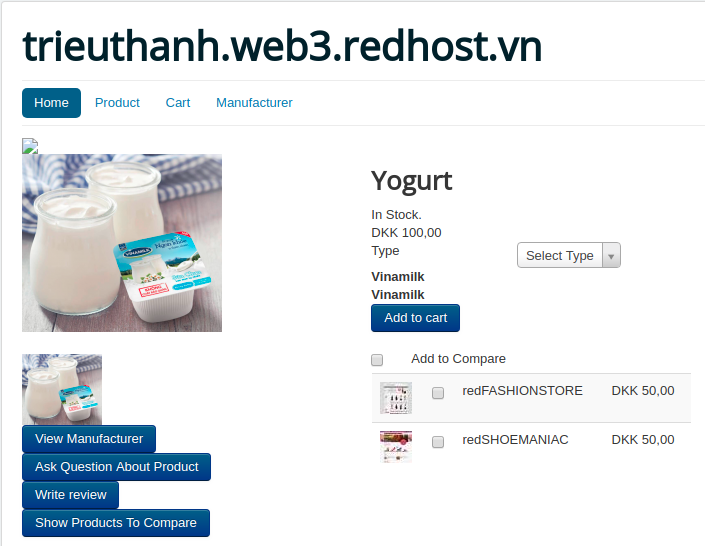
With this feature, you can assign accessory products to be offered together with this product as well as their price conditions. The accessories that you assign will appear on the product page with checkboxes next to them so the customer can include them in their selection before adding to cart.
Product Source - an Ajax-powered input box from where you can look up products to add as accessories; type at least three characters that appear in the name of the product you're looking for and wait a moment for a drop-down panel with related search results to appear, then click on the name of the product to select it.
Product Name
Normal Price - the normal price currently assigned to this product
sign (+/-) - sets whether an amount should be added or removed from the normal price to result in the promotional price
Amount added - the value of the amount that should be added to or removed from the normal price
Order - the order in which you would like the accessories displayed on the product page
Delete - removes the accessory product assignment
Related Product
 On frontend
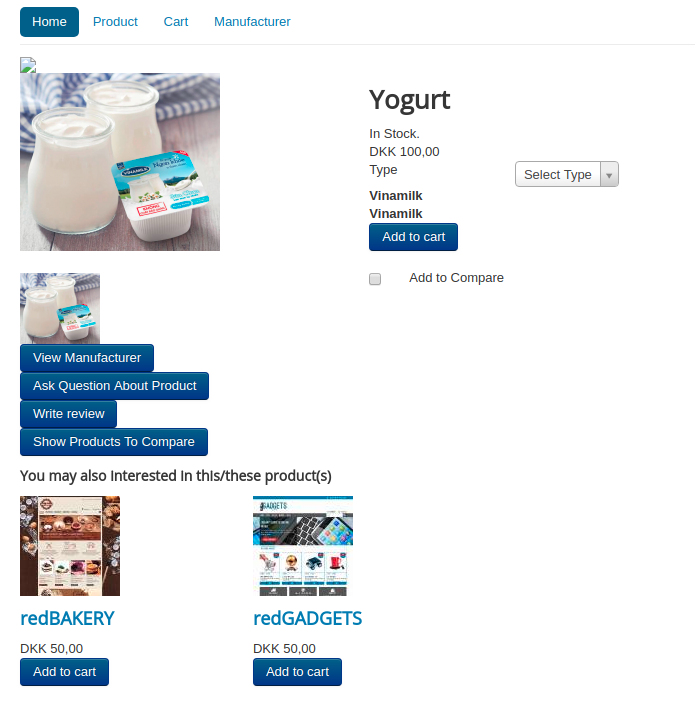
Search for products - an Ajax-powered input box from where you can look up products to add as related products; type at least three characters that appear in the name of the product you're looking for and wait a moment for a drop-down panel with related search results to appear, then click on the name of the product to select it.
Related Product - a list of all the products related to this one and four buttons to manage them: the -> button will add a product to the list, the <- button will remove it, and the "Up" and "Down" buttons will rearrange the order in which they are displayed on the front-end.
Add Child Product as Related Product - normally child products will be indicated on the cart as a variation of the main product, but when this is checked they will be added to the cart as a separate related product
redPRODUCTFINDER Association
This tab will appear if you have redPRODUCTFINDER installed, and makes it simple to associate this product with specific product finder tags that the customers can use to narrow down their selection. When you have set up a form and have defined some types and tags to go with it, a list of those types will appear in this tab with the "Type:" label next to each name. Move the mouse cursor over the type name and the mouse icon will change to a hand, indicating you can click on it to open a panel that will display the tags you can associate this product with, the "quality score" value that defines the weight and priority given to the association when calculating relevance to search results, and a list of tags that you can assign dependencies to, meaning the customer will have to search using another tag for the product association with this one to be relevant. More information is available in the redPRODUCTFINDER section of the manual.
SEO tab
 SEO Page Title - the title of the product page, as it will be displayed in search engine results and in the browser's title bar or tab
SEO Page Heading - the main heading for this product page
SEF Url - the search engine friendly URL that will be used instead of the standard Joomla! URL that is generated for this product page
Category in SEF Url - if the product is assigned to multiple categories, this drop-down menu lets you pick the name of the main category that should appear in the search engine friendly links
SEO Keywords - a space to insert the meta-keywords that are related to this product page
SEO Page Description - a space to insert the method description that is related to this product page
Meta Language Setting - a space to include the languages for which these SCO settings will apply for this product page, indicated by the Joomla! type language and country codes separated by commas, for example "en-GB, fr-FR"
SEO Robot Info - a space to include specific instructions for search engine web crawlers and bots , if the instructions for this page differ from the general instructions that can be put in redSHOP's global configuration SCO tab
Discount Calculator tab

Use Discount Calculator - (Available options: Yes, No)
Discount Calculator Method - (Select: Volume, Area, Circumfrence)
Calculation based on - (Select: Range, Price per Piece)
Unit - (Millimeter, Centimeter, Meter)
Range -
Price -
'Add/Delete' -
Option Name -
sign (+/-) - (Plus, Minus, Percentage)
Price -
'Add/Delete' -
Economic Settings tab
 e-conomic Account Group - when you are using the e-conomic accounting integration and have set up a product group profile, you can use this option to assign this product to a specific group
Default product quantities: - while the customer can decide on a specific quantity of product to the cart, you can use this field to present quantity steps to make it easier for your customers to select specific quantities; simply enter the quantity values separated by commas, such as "1,5,10,20,50", make sure the {addtocart_quantity_selectbox} tag has been used in the template for your add to cart button, and your customers can pick these quantities from a drop-down menu
Actions:
Add Price - clicking this button will redirect you to an overview where you can add and manage price brackets and price levels for members of specific shopper groups, as well as discount prices and the length of promotion
Apply - saves any changes made and refreshes the page
Save - saves any changes made and redirects to the listing screen
Cancel - returns to the listing screen without saving any changes
Payment methods tab
Video for Payment product in redSHOP: Click here
 Payment method - method payment of product. It can yes or no
Use Individual Payment Method - Use or no Payment method for product
Select Payment method - where contain some payment method of shop
Create product items
Mass Discount Product
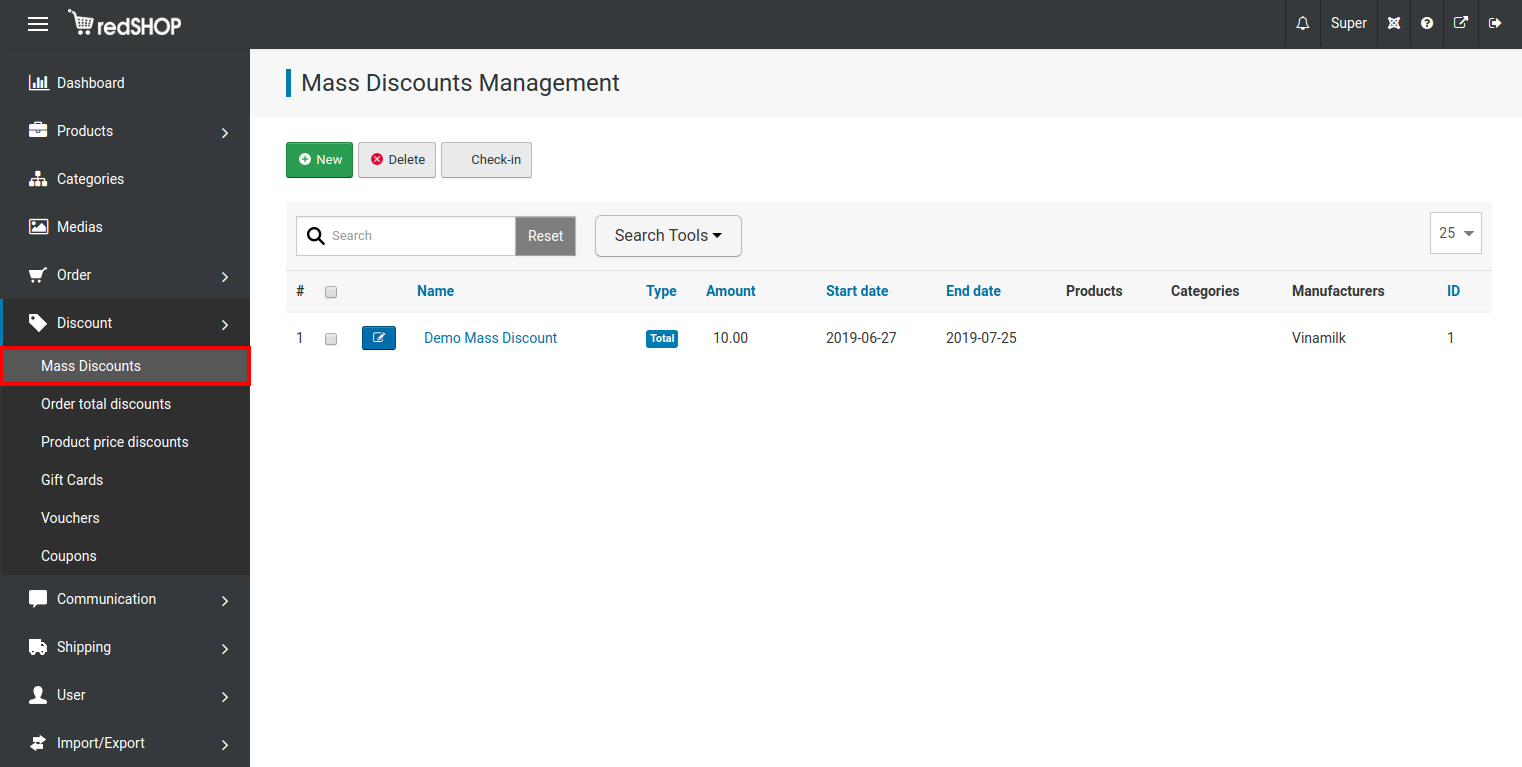
Fields:
Discount Name - the name given to the discount or promotion
Discount amount - the amount that the discount is worth
Discount Type - the way the discount will be applied, either as a percentage or a total sum
Discount Start Date - indicates the date when the promotional discount price should start being offered, left blank by default indicating that the discount price is on offer indefinitely; to set the date, click on the calendar icon and select the date using the pop-up calendar, and to remove it simply highlight and delete the stored date
Discount End Date - indicates the date when the promotional discount price should stop being offered, left blank by default indicating that the discount price is on offer indefinitely; to set the date, click on the calendar icon and select the date using the pop-up calendar, and to remove it simply highlight and delete the stored date
Products - an Ajax-powered input box from where you can look up products that this discount should apply to; type at least three characters that appear in the name of the product you're looking for and wait a moment for a drop-down panel with related search results to appear, then click on the name of the product to select it.
Category - when you want to set the discount to apply to groups of products in one or more categories, make your selection from this list (holding down the control key on the keyboard to select multiple categories)
Manufacturer - when you want to set the discount to apply to products assigned to one or more manufacturers, make your selection from this list (holding down the control key on the keyboard to select multiple categories)
ID - order mass discount items
Actions:
New - takes you to the add discount screen where you can add a new discount to the catalog
Edit - takes you to the edit product screen where you can modify an existing discount profile. The screen can be reached either by clicking on the discount name or clicking on the checkbox next to their name followed by the edit button
Delete - removes the discount from the product catalog, this is a permanent delete
Check-in - will unlock any items manufacturer when someone viewing it
Add Mass Discount details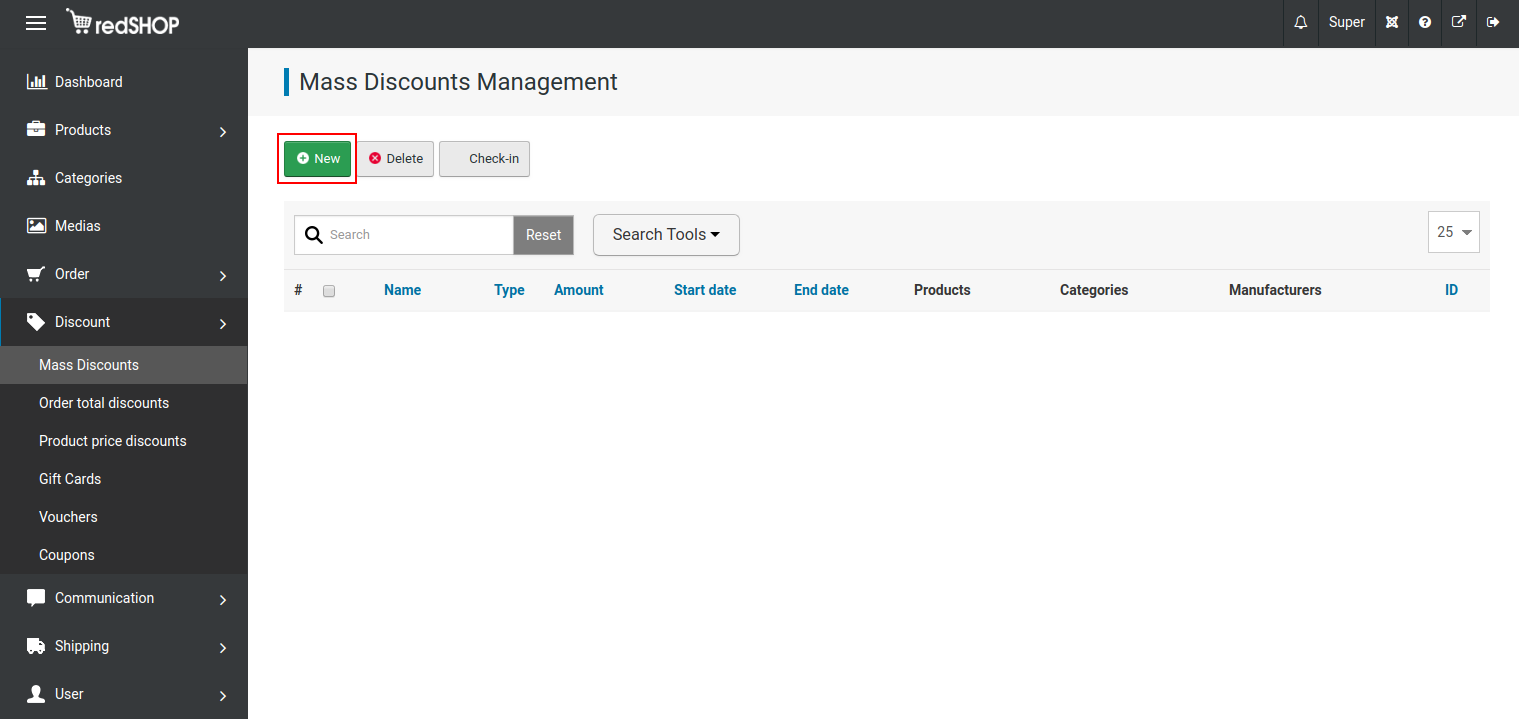
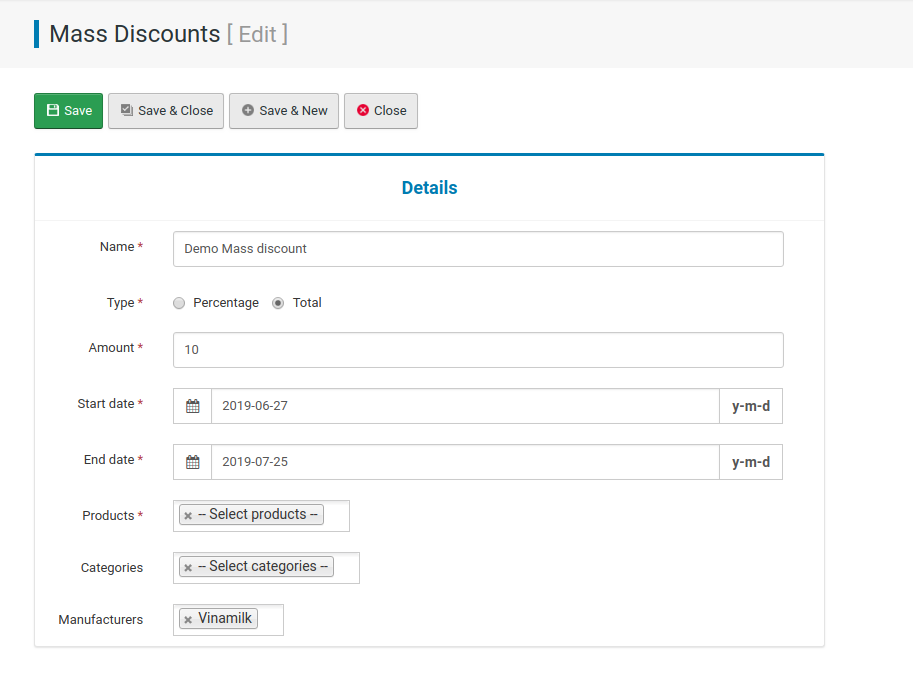
Fields:
Discount Name - the name given to the discount or promotion
Discount Type - the way the discount will be applied, either as a percentage or a total sum
Discount amount - the amount that the discount is worth; enter the full price value of the discount if it is a total sum, and if it is a percentage then enter a decimal value for redSHOP to use in calculations, such as a value of 0.12 to represent 12%
Discount Start Date - indicates the date when the promotional discount price should start being offered, left blank by default indicating that the discount price is on offer indefinitely; to set the date, click on the calendar icon and select the date using the pop-up calendar, and to remove it simply highlight and delete the stored date
Discount End Date - indicates the date when the promotional discount price should stop being offered, left blank by default indicating that the discount price is on offer indefinitely; to set the date, click on the calendar icon and select the date using the pop-up calendar, and to remove it simply highlight and delete the stored date
Discount Products - an Ajax-powered input box from where you can look up products that this discount should apply to; type at least three characters that appear in the name of the product you're looking for and wait a moment for a drop-down panel with related search results to appear, then click on the name of the product to select it.
Category - when you want to set the discount to apply to groups of products in one or more categories, make your selection from this list (holding down the control key on the keyboard to select multiple categories)
Manufacturer - when you want to set the discount to apply to products assigned to one or more manufacturers, make your selection from this list (holding down the control key on the keyboard to select multiple manufacturer)
Actions
Save - saves any changes made and refreshes the page
Save & Close - saves any changes made and redirects to the listing screen
Save & New - saves any changes made and redirects to the page create new
Close - returns to the listing screen without saving any changes when on in edit item view
Cancel - returns to the listing screen without saving any changes when on in new create item view
Product Price Discount
Product Price Discount Listing screen
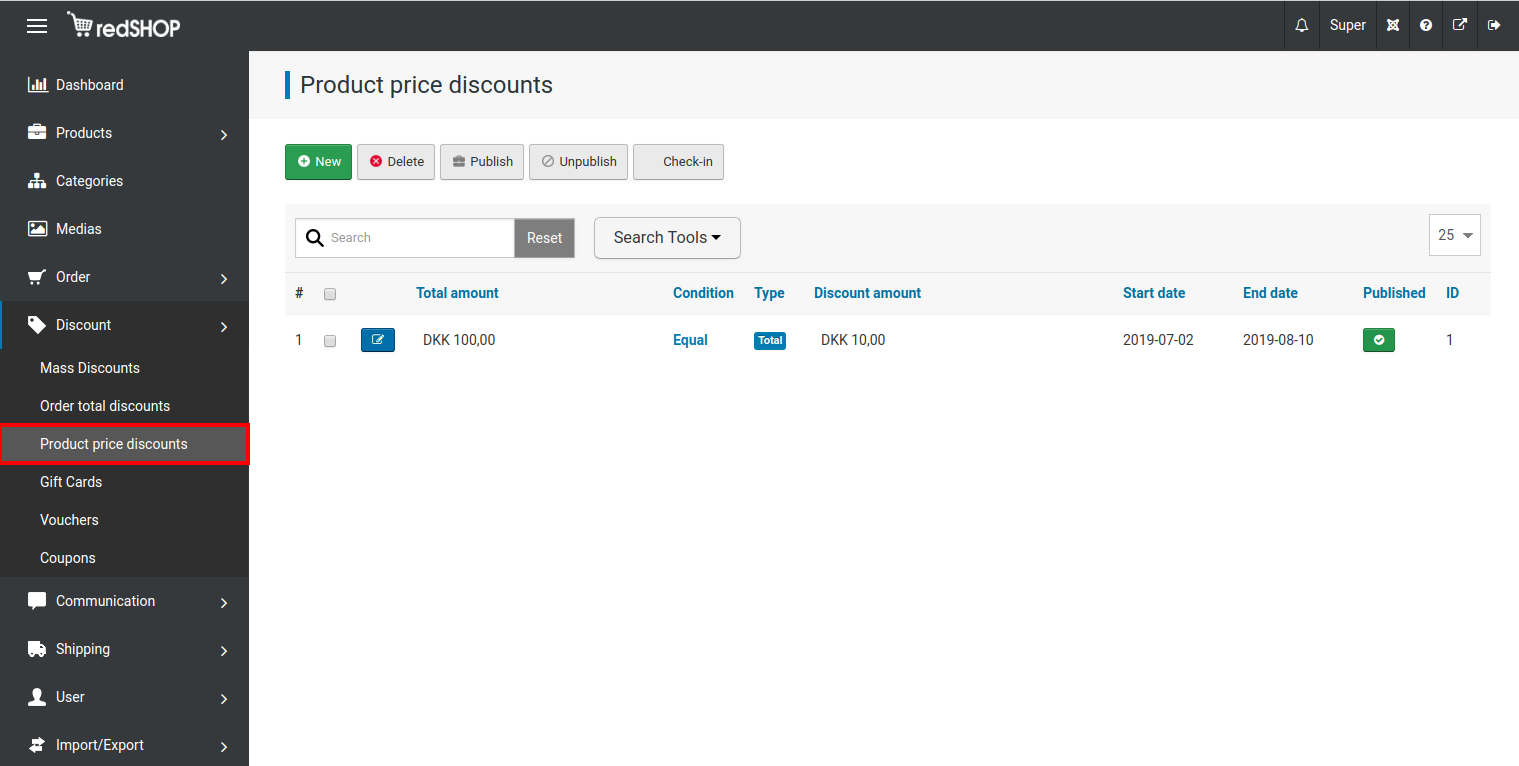
Total amount - the amount that the discount is worth
Condition - condition can apply for product price lower, equal, higher
Discount Type - the way the discount will be applied, either as a percentage or a total sum
Discount amount - the amount will discount
Discount Start Date - indicates the date when the promotional discount price should start being offered, left blank by default indicating that the discount price is on offer indefinitely; to set the date, click on the calendar icon and select the date using the pop-up calendar, and to remove it simply highlight and delete the stored date
Discount End Date - indicates the date when the promotional discount price should stop being offered, left blank by default indicating that the discount price is on offer indefinitely; to set the date, click on the calendar icon and select the date using the pop-up calendar, and to remove it simply highlight and delete the stored date
Icon Publish/Unpublish - view status product price discount item have apply or not
ID - order product price discount items
Actions:
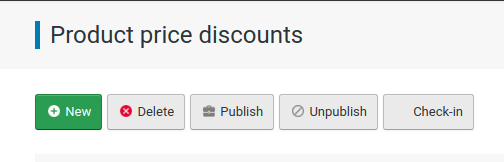
New - takes you to the add discount screen where you can add a new discount to the catalog
Edit - takes you to the edit product screen where you can modify an existing discount profile. The screen can be reached either by clicking on the discount name or clicking on the checkbox next to their name followed by the edit button
Delete - removes the discount from the product catalog, this is a permanent delete
Publish/
Unpublish button - view status product price discount item have apply or not
Check-in - will unlock any items manufacturer when someone viewing it
Add Product Price Discount details

 Fields:
Total amount - the amount that the discount is worth
Condition - condition can apply for product price lower, equal, higher
Discount Type - the way the discount will be applied, either as a percentage or a total sum
Discount amount - the amount that the discount is worth; enter the full price value of the discount if it is a total sum, and if it is a percentage then enter a decimal value for redSHOP to use in calculations, such as a value of 0.12 to represent 12%
Discount Start Date - indicates the date when the promotional discount price should start being offered, left blank by default indicating that the discount price is on offer indefinitely; to set the date, click on the calendar icon and select the date using the pop-up calendar, and to remove it simply highlight and delete the stored date
Discount End Date - indicates the date when the promotional discount price should stop being offered, left blank by default indicating that the discount price is on offer indefinitely; to set the date, click on the calendar icon and select the date using the pop-up calendar, and to remove it simply highlight and delete the stored date
Category - when you want to set the discount to apply to groups of products in one or more categories, make your selection from this list (holding down the control key on the keyboard to select multiple categories)
Shopper group - when you want to set the discount to apply to products assigned to one or more shopper group, make your selection from this list (holding down the control key on the keyboard to select multiple shopper group)
Publish - Status of items, if it choose "Yes" it will apply discount for products satisfy conditions, when choose "No" will remove discount for product has satisfy condition
Actions

Save - saves any changes made and refreshes the page
Save & Close - saves any changes made and redirects to the listing screen
Save & New - saves any changes made and redirects to the page create new
Close - returns to the listing screen without saving any changes when on in edit item view
Cancel - returns to the listing screen without saving any changes when on in new create item view
Video work for Product Price Discount in redSHOP:
Click here


 Webpage will show "Product Price Management"
 Search box - if you want to display specific records, type in at least two characters that appear in the product name, number or associated category of what you're looking for and click on the search button to update and refine the products listed


 Webpage will show popup have contain image product

 Select "Yes" on Show Product Detail Image in Lightbox. Then go to product detail and click on main image


 On frontend
 SEO Page Title - the title of the product page, as it will be displayed in search engine results and in the browser's title bar or tab
 e-conomic Account Group - when you are using the e-conomic accounting integration and have set up a product group profile, you can use this option to assign this product to a specific group
 Payment method - method payment of product. It can yes or no


 Fields: